Week 5 [Fri, Feb 9th] - Topics
Guidance for the item(s) below:
As you have learned the Java basic topics already, it is time to move to intermediate level topics. This week, we cover several such topics, starting with the one given below.
Guidance for the item(s) below:
It is time to move on to some intermediate level OOP concepts. Next, let's learn about abstract classes and how they are implemented in Java.
Guidance for the item(s) below:
From abstract classes, we move to another related OOP concept interfaces, and how they are implemented in Java.
Can use interfaces in Java
The text given in this section borrows some explanations and code examples from the -- Java Tutorial.
In Java, an interface is a reference type, similar to a class, mainly containing method signatures. Defining an interface is similar to creating a new class except it uses the keyword interface in place of class.
Here is an interface named DrivableVehicle that defines methods needed to drive a vehicle.
public interface DrivableVehicle {
    void turn(Direction direction);
    void changeLanes(Direction direction);
    void signalTurn(Direction direction, boolean signalOn);
    // more method signatures
}
Note that the method signatures have no braces ({ }) and are terminated with a semicolon.
Interfaces cannot be instantiated—they can only be implemented by classes. When an instantiable class implements an interface, indicated by the keyword implements, it provides a method body for each of the methods declared in the interface.
Here is how a class CarModelX can implement the DrivableVehicle interface.
public class CarModelX implements DrivableVehicle {

    @Override
    public void turn(Direction direction) {
       // implementation
    }

    // implementation of other methods
}
An interface can be used as a type e.g., DrivableVehicle dv = new CarModelX();.
Interfaces can inherit from other interfaces using the extends keyword, similar to a class inheriting another.
Here is an interface named SelfDrivableVehicle that inherits the DrivableVehicle interface.
public interface SelfDrivableVehicle extends DrivableVehicle {
   void goToAutoPilotMode();
}
Note that the method signatures have no braces and are terminated with a semicolon.
Furthermore, Java allows multiple inheritance among interfaces. A Java interface can inherit multiple other interfaces. A Java class can implement multiple interfaces (and inherit from one class).
The design below is allowed by Java. In case you are not familiar with UML notation used: solid lines indicate normal inheritance; dashed lines indicate interface inheritance; the triangle points to the parent.
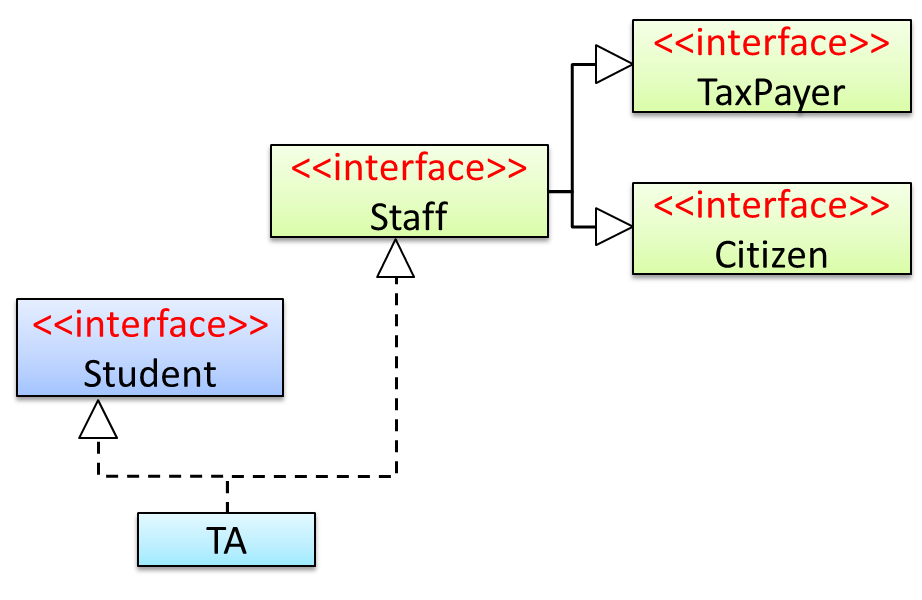
Staffinterface inherits (note the solid lines) the interfacesTaxPayerandCitizen.TAclass implements bothStudentinterface and theStaffinterface.- Because of point 1 above,
TAclass has to implement all methods in the interfacesTaxPayerandCitizen. - Because of points 1,2,3, a
TAis aStaff, is aTaxPayerand is aCitizen.
Interfaces can also contain constants and static methods.
This example adds a constant MAX_SPEED and a static method isSpeedAllowed to the interface DrivableVehicle.
public interface DrivableVehicle {

    int MAX_SPEED = 150;

    static boolean isSpeedAllowed(int speed){
        return speed <= MAX_SPEED;
    }

    void turn(Direction direction);
    void changeLanes(Direction direction);
    void signalTurn(Direction direction, boolean signalOn);
    // more method signatures
}
Interfaces can contain default method implementations and nested types. They are not covered here.
Guidance for the item(s) below:
As you add more and more Java classes to your project, keeping all those classes in the same directory becomes untenable. The solution is covered in the next topic.
Guidance for the item(s) below:
As the size of your Java code base grows, every class being able to access every member of every other class can be problematic. Hence, there should be a way to control the access to our Java classes and their members. The solution is given in the topic below.
Guidance for the item(s) below:
So far, your iP may have assumed a 'perfect world' e.g., user input is always in the expected format. To make the product ready for the not-so-perfect real world, the code should be able to handle error conditions. Let's learn how to do that.
Guidance for the item(s) below:
This week, you will be dealing with the requirements aspect of the tP. While there isn't time in this week to learn that topic fully, let's learn a couple the techniques you'll be using to deal with requirements of your tP this week: user stories and feature lists.
User Stories
Can write simple user stories
User story: User stories are short, simple descriptions of a feature told from the perspective of the person who desires the new capability, usually a user or customer of the system. [Mike Cohn]
A common format for writing user stories is:
User story format: As a {user type/role} I can {function} so that {benefit}
Examples (from a Learning Management System):
- As a student, I can download files uploaded by lecturers, so that I can get my own copy of the files
- As a lecturer, I can create discussion forums, so that students can discuss things online
- As a tutor, I can print attendance sheets, so that I can take attendance during the class
You can write user stories using a physical medium or a digital tool. For example, you can use index cards or sticky notes, and arrange them on walls or tables. Alternatively, you can use a software (e.g., GitHub Project Boards, Trello, Google Docs, ...) to manage user stories digitally.
User stories in use
With sticky notes

With paper

With software
Feature Lists
Guidance for the item(s) below:
Let's learn about a few more Git techniques, starting with branching. Although these techniques are not really needed for the iP, we require you to use them in the iP so that you have more time to practice them before they are really needed in the tP.
Can explain branching
Branching is the process of evolving multiple versions of the software in parallel. For example, one team member can create a new branch and add an experimental feature to it while the rest of the team keeps working on another branch. Branches can be given names e.g. master, release, dev.
A branch can be merged into another branch. Merging usually results in a new commit that represents the changes done in the branch being merged.
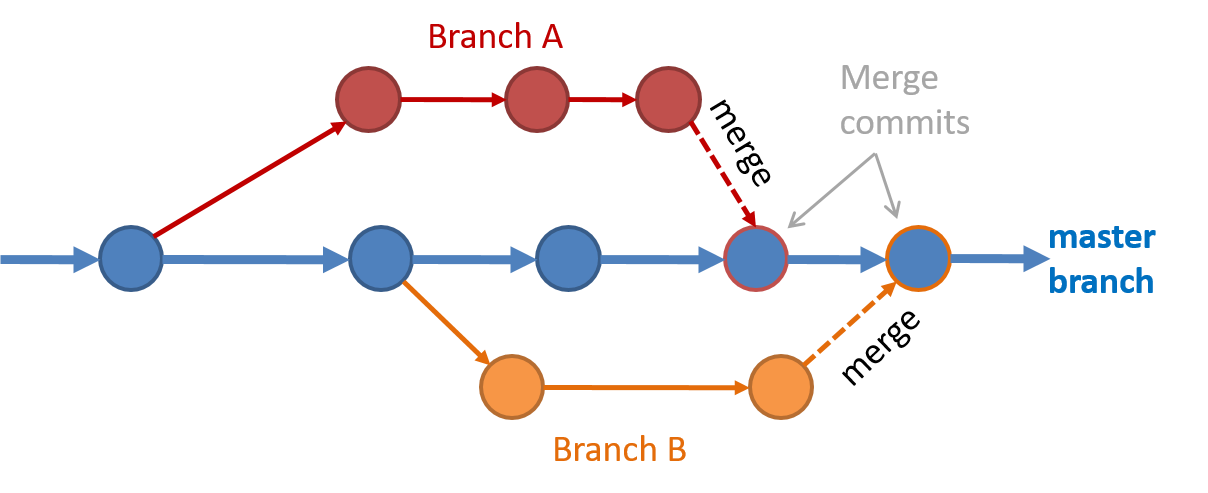 Branching and merging
 Merge conflicts happen when you try to merge two branches that had changed the same part of the code and the RCS cannot decide which changes to keep. In those cases, you have to ‘resolve’ the conflicts manually.
Can use Git branching
Git supports branching, which allows you to do multiple parallel changes to the content of a repository.
First, let us learn how the repo looks like as you perform branching operations.
A Git branch is simply a named label pointing to a commit. The HEAD label indicates which branch you are on. Git creates a branch named master by default. When you add a commit, it goes into the branch you are currently on, and the branch label (together with the HEAD label) moves to the new commit.
Given below is an illustration of how branch labels move as branches evolve. Refer to the text below it for explanations of each stage.
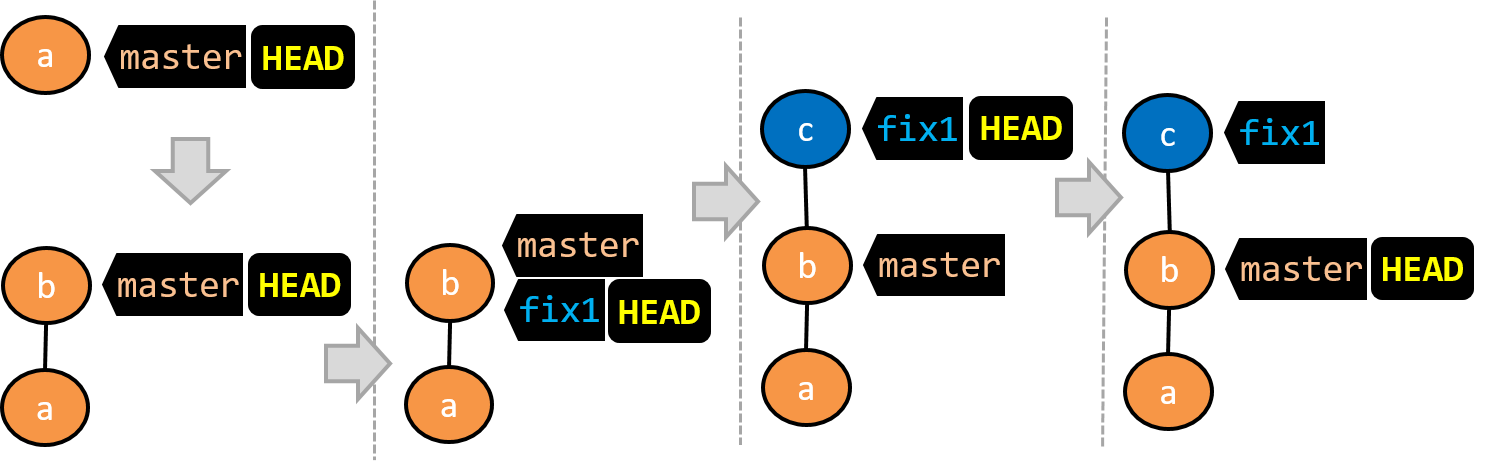
There is only one branch (i.e.,
master) and there is only one commit on it. TheHEADlabel is pointing to themasterbranch (as we are currently on that branch).To learn a bit more about how labels such as
masterandHEADwork, you can refer to this article.A new commit has been added. The
masterand theHEADlabels have moved to the new commit.A new branch
fix1has been added. The repo has switched to the new branch too (hence, theHEADlabel is attached to thefix1branch).A new commit (
c) has been added. The current branch labelfix1moves to the new commit, together with theHEADlabel.The repo has switched back to the
masterbranch. Hence, theHEADhas moved back tomasterbranch's .
At this point, the repo's working directory reflects the code at commitb(notc).
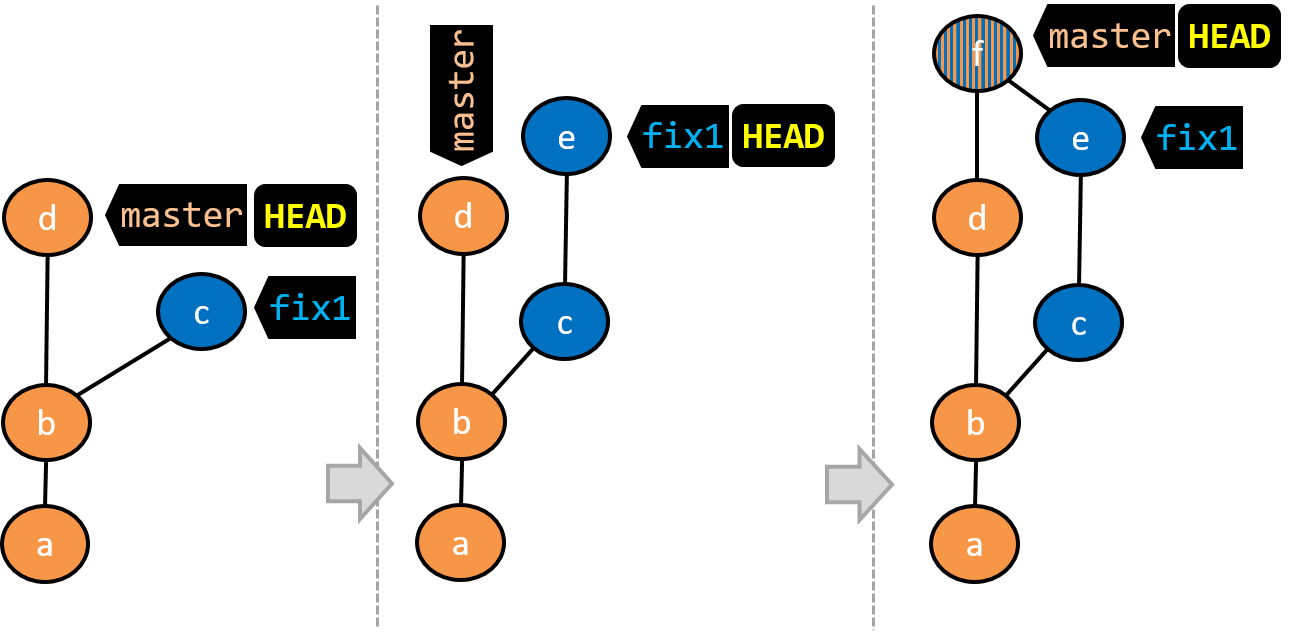
- A new commit (
d) has been added. Themasterand theHEADlabels have moved to that commit. - The repo has switched back to the
fix1branch and added a new commit (e) to it. - The repo has switched to the
masterbranch and thefix1branch has been merged into themasterbranch, creating a merge commitf. The repo is currently on themasterbranch.
Now that you have some idea how the repo will look like when branches are being used, let's follow the steps below to learn how to perform branching operations using Git. You can use any repo you have on your computer (e.g. a clone of the samplerepo-things) for this.
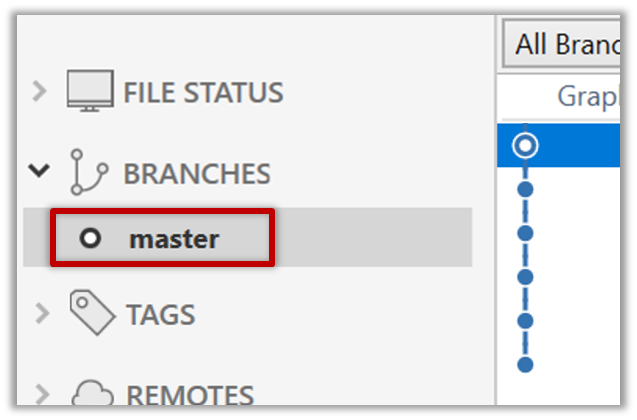
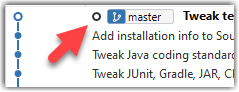
0. Observe that you are normally in the branch called master.
$ git status
on branch master
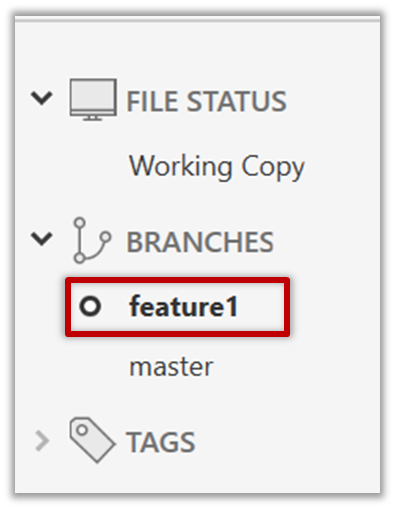
1. Start a branch named feature1 and switch to the new branch.
Click on the Branch button on the main menu. In the next dialog, enter the branch name and click Create Branch.
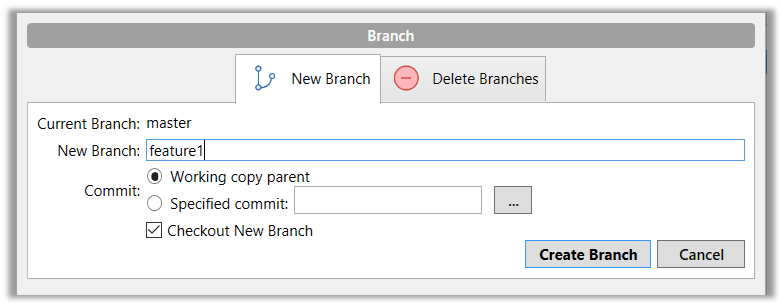
Note how the feature1 is indicated as the current branch (reason: Sourcetree automatically switches to the new branch when you create a new branch).
You can use the branch command to create a new branch and the checkout command to switch to a specific branch.
$ git branch feature1
$ git checkout feature1
One-step shortcut to create a branch and switch to it at the same time:
$ git checkout –b feature1
2. Create some commits in the new branch. Just commit as per normal. Commits you add while on a certain branch will become part of that branch.
Note how the master label and the HEAD label moves to the new commit (The HEAD label of the local repo is represented as in Sourcetree).
3. Switch to the master branch. Note how the changes you did in the feature1 branch are no longer in the working directory.
Double-click the master branch.
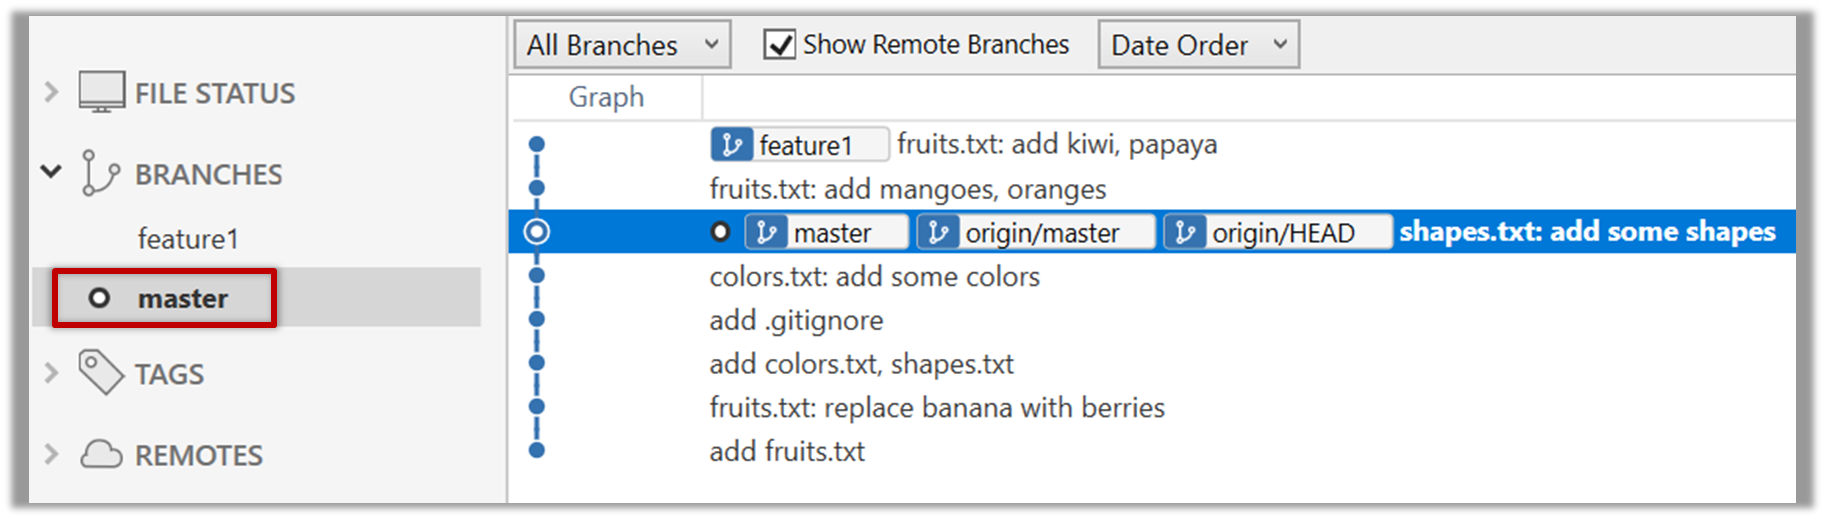
$ git checkout master
4. Add a commit to the master branch. Let’s imagine it’s a bug fix.
To keep things simple for the time being, this commit should not involve the same content that you changed in the feature1 branch. To be on the safe side, you can change an entirely different file in this commit.

5. Switch back to the feature1 branch (similar to step 3).
6. Merge the master branch to the feature1 branch, giving an end-result like the following. Also note how Git has created a merge commit.
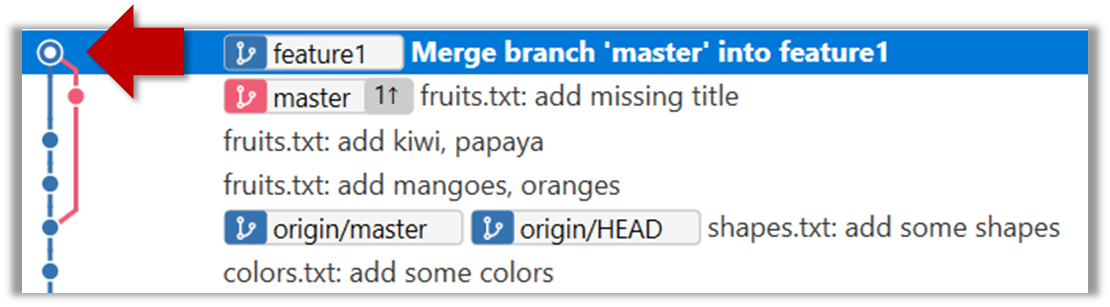
Right-click on the master branch and choose merge master into the current branch. Click OK in the next dialog.
$ git merge master
The objective of that merge was to sync the feature1 branch with the master branch. Observe how the changes you did in the master branch (i.e. the imaginary bug fix) is now available even when you are in the feature1 branch.
To undo a merge,
- Ensure you are in the branch that received the merge.
- Do a hard reset (similar to how you delete a commit) of that branch to the commit that would be the tip of that branch had you not done the offending merge.
In the example below, you merged master to feature1.
If you want to undo that merge,
- Ensure you are in the
feature1branch. - Reset the
feature1branch to the commit highlighted in the screenshot above (because that was the tip of thefeature1branch before you merged themasterbranch to it.
Instead of merging master to feature1, an alternative is to rebase the feature1 branch. However, rebasing is an advanced feature that requires modifying past commits. If you modify past commits that have been pushed to a remote repository, you'll have to force-push the modified commit to the remote repo in order to update the commits in it.
7. Add another commit to the feature1 branch.
8. Switch to the master branch and add one more commit.
9. Merge feature1 to the master branch, giving and end-result like this:
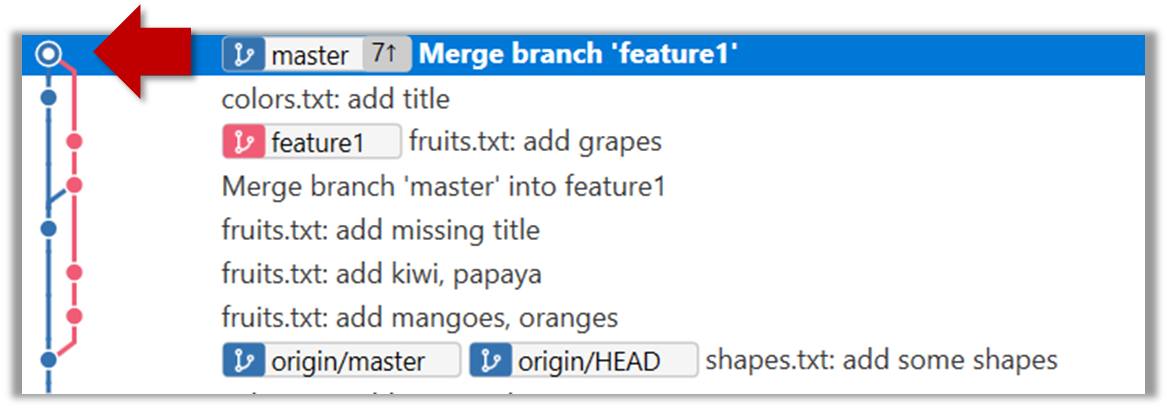
Right-click on the feature1 branch and choose Merge....
$ git merge feature1
10. Create a new branch called add-countries, switch to it, and add some commits to it (similar to steps 1-2 above). You should have something like this now:

Avoid this common rookie mistake!
Always remember to switch back to the master branch before creating a new branch. If not, your new branch will be created on top of the current branch.
11. Go back to the master branch and merge the add-countries branch onto the master branch (similar to steps 8-9 above). While you might expect to see something like the following,
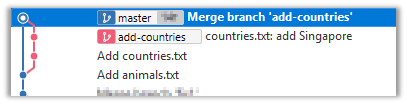
... you are likely to see something like this instead:

That is because Git does a fast forward merge if possible. Seeing that the master branch has not changed since you started the add-countries branch, Git has decided it is simpler to just put the commits of the add-countries branch in front of the master branch, without going into the trouble of creating an extra merge commit.
It is possible to force Git to create a merge commit even if fast forwarding is possible.
Tick the box shown below when you merge a branch:
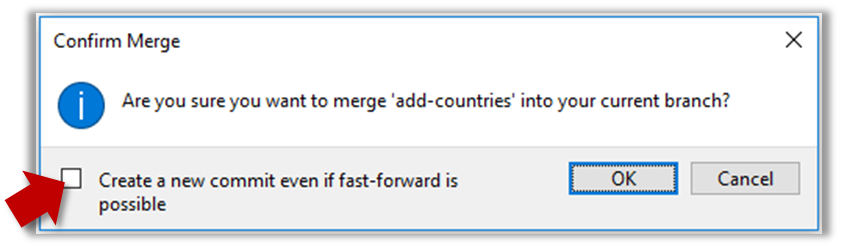
Use the --no-ff switch (short for no fast forward):
$ git merge --no-ff add-countries
Can work with remote branches
Git branches in a local repo can be linked to a branch in a remote repo so the local branch can 'track' the corresponding remote branch, and revision history contained in the local and the remote branch pair can be synchronized as desired.
[A] Pushing a new branch to a remote repo
Let's see how you can push a branch that you created in your local repo to the remote repo. Note that this branch does not exist in the remote repo yet.
Given below is how to push a branch named add-intro to your own fork named samplerepo-pr-practice.
We assume that your local repo already has the remote added to it with the name origin. If that is not the case, you should first configure your local repo to be able to communicate with the target remote repo.
- Click on
Pushbutton, which opens up the Push dialog. - Choose the remote that you wish to push the branch (assuming you've added that repo to your Sourcetree already).
- Select the branch(es) you want to push -- in this case,
add-intro.
Ensure theTrack?checkbox is ticked for the selected branch(es). - Click
Push.
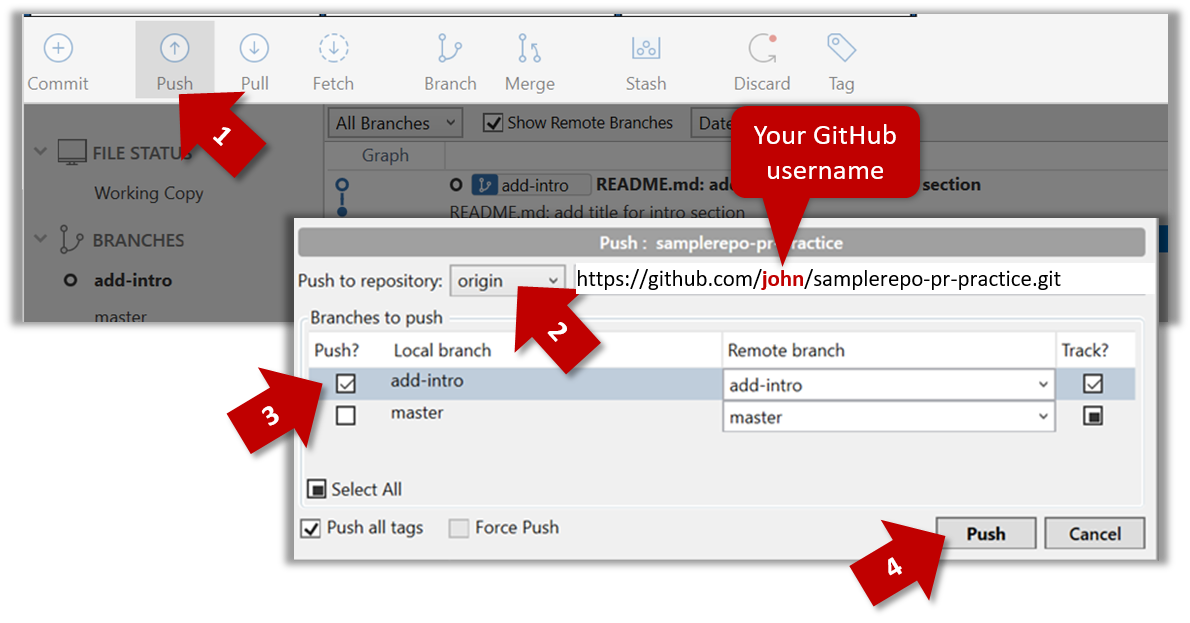
$ git push -u origin add-intro
The -u (or --update) flag tells Git that you wish the local branch to 'track' the remote branch that will be created as a result of this push.
See git-scm.com/docs/git-push for details of the push command.
[B] Pulling a remote branch for the first time
Here, let's see how to fetch a new branch (i.e., it does not exist in your local repo yet) from a remote repo.
1. Check the list of remote branches by expanding the REMOTES menu on the left edge of Sourcetree. If the branch you expected to find is missing, you can click the Fetch button (in the top toolbar) to refresh the information shown under remotes.
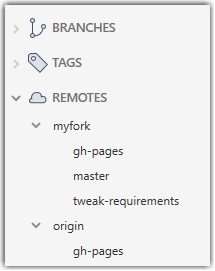
2. Double-click the branch name (e.g., tweak-requirements branch in the myfork remote), which should open the checkout dialog shown below.
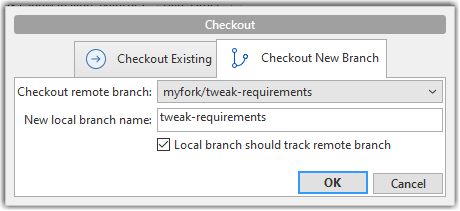
3. Go with the default settings (shown above) should be fine. Once you click OK, the branch will appear in your local repo. Furthermore, that repo will switch to that branch, and the local branch will the remote branch as well.
1. Fetch details from the remote. e.g., if the remote is named myfork
$ git fetch myfork
2. List the branches to see the name of the branch you want to pull.
$ git branch -a
master
remotes/myfork/master
remotes/myfork/branch1
-a flag tells Git to list both local and remote branches.
3. Create a matching local branch and switch to it.
$ git switch -c branch1 myfork/branch1
Switched to a new branch 'branch1'
branch 'branch1' set up to track 'myfork/branch1'.
-c flag tells Git to create a new local branch.
[C] Syncing branches
In this section we assume that you have a local branch that is already tracking a remote branch (e.g., as a result of doing [A] or [B] above).
To push new changes in the local branch to the corresponding remote branch:
Similar to how you pushed a new branch (in [A]):
Similar to [A] above, but omit the -u flag. e.g.,
$ git push origin add-intro
If you push but the remote branch has new commits that you don't have locally, Git will abort the push and will ask you to pull first.
To pull new changes from a remote branch to the corresponding local branch:
1. Switch to the branch you want to update by double-clicking the branch name. e.g.,
2. Pull the updated in the remote branch to the local branch by right-clicking on the branch name (in the same place as above), and choosing Pull <remote>/<branch> (tracked) e.g., Pull myfork/add-intro (tracked).
1. Switch to the branch you want to update using git checkout <branch> e.g.,
$ git checkout branch1
2. Pull the updated in the remote branch to the local branch, using git pull <remote> <branch> e.g.,
$ git pull origin branch1
If you pull but your local branch has new commits the remote branch doesn't have, Git will automatically perform a merge between the local branch and the remote branch.