This site is from a past semester! The current version will be here when the new semester starts.

Week 9 [Fri, Mar 15th] - Topics

Detailed Table of Contents


Guidance for the item(s) below:

This week, let us learn the remaining class diagram notations.

[W9.1] Class Diagrams: Intermediate-Level

W9.1a

Design → Modelling → Modelling Structure → Class diagrams - intermediate

Can use intermediate-level class diagrams

A class diagram can also show different types of relationships between classes: inheritance, compositions, aggregations, dependencies.

Modeling inheritance

OOP → Inheritance → What

Loading...

UML → Class Diagrams → Inheritance → What

Loading...

Modeling composition

OOP → Associations → Composition

Loading...

UML → Class Diagrams → Composition → What

Loading...

Modeling aggregation

OOP → Associations → Aggregation

Loading...

UML → Class Diagrams → Aggregation → What

Loading...

Modeling dependencies

OOP → Associations → Dependencies

Loading...

UML → Class Diagrams → Dependencies → What

Loading...

A class diagram can also show different types of class-like entities:

Modeling enumerations

OOP → Classes → Enumerations

Loading...

UML → Class Diagrams → Enumerations → What

Loading...

Modeling abstract classes

OOP → Inheritance → Abstract Classes

Loading...

UML → Class Diagrams → Abstract Classes → What

Loading...

Modeling interfaces

OOP → Inheritance → Interfaces

Loading...

UML → Class Diagrams → Interfaces → What

Loading...


Exercises:

Statements about class diagrams


Explain notations in the class diagram


Draw a Class Diagram for the code (StockItem, Inventory, Review, etc.)


Guidance for the item(s) below:

Given next are two techniques that help you locate problems in the code: logging, and assertions

[W9.2] Logging

W9.2a

Implementation → Error Handling → Logging → What

Can explain logging

Logging is the deliberate recording of certain information during a program execution for future reference. Logs are typically written to a log file but it is also possible to log information in other ways e.g. into a database or a remote server.

Logging can be useful for troubleshooting problems. A good logging system records some system information regularly. When bad things happen to a system e.g. an unanticipated failure, their associated log files may provide indications of what went wrong and actions can then be taken to prevent it from happening again.

A log file is like the of an airplane; they don't prevent problems but they can be helpful in understanding what went wrong after the fact.


Exercises:

Logging vs blackbox


W9.2b

Implementation → Error Handling → Logging → How

Can use logging

Most programming environments come with logging systems that allow sophisticated forms of logging. They have features such as the ability to enable and disable logging easily or to change the logging .

This sample Java code uses Java’s default logging mechanism.

First, import the relevant Java package:

import java.util.logging.*;

Next, create a Logger:

private static Logger logger = Logger.getLogger("Foo");

Now, you can use the Logger object to log information. Note the use of a for each message. When running the code, the logging level can be set to WARNING so that log messages specified as having INFO level (which is a lower level than WARNING) will not be written to the log file at all.

// log a message at INFO level
logger.log(Level.INFO, "going to start processing");
// ...
processInput();
if (error) {
    // log a message at WARNING level
    logger.log(Level.WARNING, "processing error", ex);
}
// ...
logger.log(Level.INFO, "end of processing");

Resources:

Tutorials:

  • A video tutorial by SimplyCoded:

Best Practices:


[W9.3] Assertions

W9.3a

Implementation → Error Handling → Assertions → What

Can explain assertions

Assertions are used to define assumptions about the program state so that the runtime can verify them. An assertion failure indicates a possible bug in the code because the code has resulted in a program state that violates an assumption about how the code should behave.

An assertion can be used to express something like when the execution comes to this point, the variable v cannot be null.

If the runtime detects an assertion failure, it typically takes some drastic action such as terminating the execution with an error message. This is because an assertion failure indicates a possible bug and the sooner the execution stops, the safer it is.

In the Java code below, suppose you set an assertion that timeout returned by Config.getTimeout() is greater than 0. Now, if Config.getTimeout() returns -1 in a specific execution of this line, the runtime can detect it as an assertion failure -- i.e. an assumption about the expected behavior of the code turned out to be wrong which could potentially be the result of a bug -- and take some drastic action such as terminating the execution.

int timeout = Config.getTimeout();
// set assertion here ...

W9.3b

Implementation → Error Handling → Assertions → How

Can use assertions

Use the assert keyword to define assertions.

This assertion will fail with the message x should be 0 if x is not 0 at this point.

x = getX();
assert x == 0 : "x should be 0";
...

Assertions can be disabled without modifying the code.

java -enableassertions HelloWorld (or java -ea HelloWorld) will run HelloWorld with assertions enabled while java -disableassertions HelloWorld will run it without verifying assertions.

Java disables assertions by default. This could create a situation where you think all assertions are being verified as true while in fact they are not being verified at all. Therefore, remember to enable assertions when you run the program if you want them to be in effect.

Enable assertions in IntelliJ (how?) and get an assertion to fail temporarily (e.g. insert an assert false into the code temporarily) to confirm assertions are being verified.

Java assert vs JUnit assertions: Both check for a given condition but JUnit assertions are more powerful and customized for testing. In addition, JUnit assertions are not disabled by default. Use JUnit assertions in test code and Java assert in functional code.


Resources:

Tutorials:

Best practices:


W9.3c

Implementation → Error Handling → Assertions → When

Can use assertions optimally

It is recommended that assertions be used liberally in the code. Their impact on performance is low, and worth the additional safety they provide.

Do not use assertions to do work because assertions can be disabled. If not, your program will stop working when assertions are not enabled.

The code below will not invoke the writeFile() method when assertions are disabled. If that method is performing some work that is necessary for your program, your program will not work correctly when assertions are disabled.

...
assert writeFile() : "File writing is supposed to return true";

Assertions are suitable for verifying assumptions about Internal Invariants, Control-Flow Invariants, Preconditions, Postconditions, and Class Invariants. Refer to Programming with Assertions (second half) to learn more.

Exceptions and assertions are two complementary ways of handling errors in software but they serve different purposes. Therefore, both assertions and exceptions should be used in code.

  • The raising of an exception indicates an unusual condition created by the user (e.g. user inputs an unacceptable input) or the environment (e.g., a file needed for the program is missing).
  • An assertion failure indicates the programmer made a mistake in the code (e.g., a null value is returned from a method that is not supposed to return null under any circumstances).

Exercises:

Assertion failure in Calculator


Statement about exceptions and assertions


Guidance for the item(s) below:

As you are still in the early stage of the project, this is a good time to learn some design principles that you can try to apply in the internal design of your product.

These principles build on top of the design fundamentals you learned earlier (i.e., abstraction, coupling, cohesion).

[W9.4] Design Principles


Abstraction

Guidance for the item(s) below:

Let's start by learning the three most fundamental design qualities upon which all other design principles are built.

W9.4a

Design → Design Fundamentals → Abstraction → What

Can explain abstraction

Abstraction is a technique for dealing with complexity. It works by establishing a level of complexity we are interested in, and suppressing the more complex details below that level.

The guiding principle of abstraction is that only details that are relevant to the current perspective or the task at hand need to be considered. As most programs are written to solve complex problems involving large amounts of intricate details, it is impossible to deal with all these details at the same time. That is where abstraction can help.

Data abstraction: abstracting away the lower level data items and thinking in terms of bigger entities

Within a certain software component, you might deal with a user data type, while ignoring the details contained in the user data item such as name, and date of birth. These details have been ‘abstracted away’ as they do not affect the task of that software component.

Control abstraction: abstracting away details of the actual control flow to focus on tasks at a higher level

print(“Hello”) is an abstraction of the actual output mechanism within the computer.

Abstraction can be applied repeatedly to obtain progressively higher levels of abstraction.

An example of different levels of data abstraction: a File is a data item that is at a higher level than an array and an array is at a higher level than a bit.

An example of different levels of control abstraction: execute(Game) is at a higher level than print(Char) which is at a higher level than an Assembly language instruction MOV.

Abstraction is a general concept that is not limited to just data or control abstractions.

Some more general examples of abstraction:

  • An OOP class is an abstraction over related data and behaviors.
  • An architecture is a higher-level abstraction of the design of a software.
  • Models (e.g., UML models) are abstractions of some aspect of reality.


Coupling

W9.4b

Design → Design Fundamentals → Coupling → What

Can explain coupling

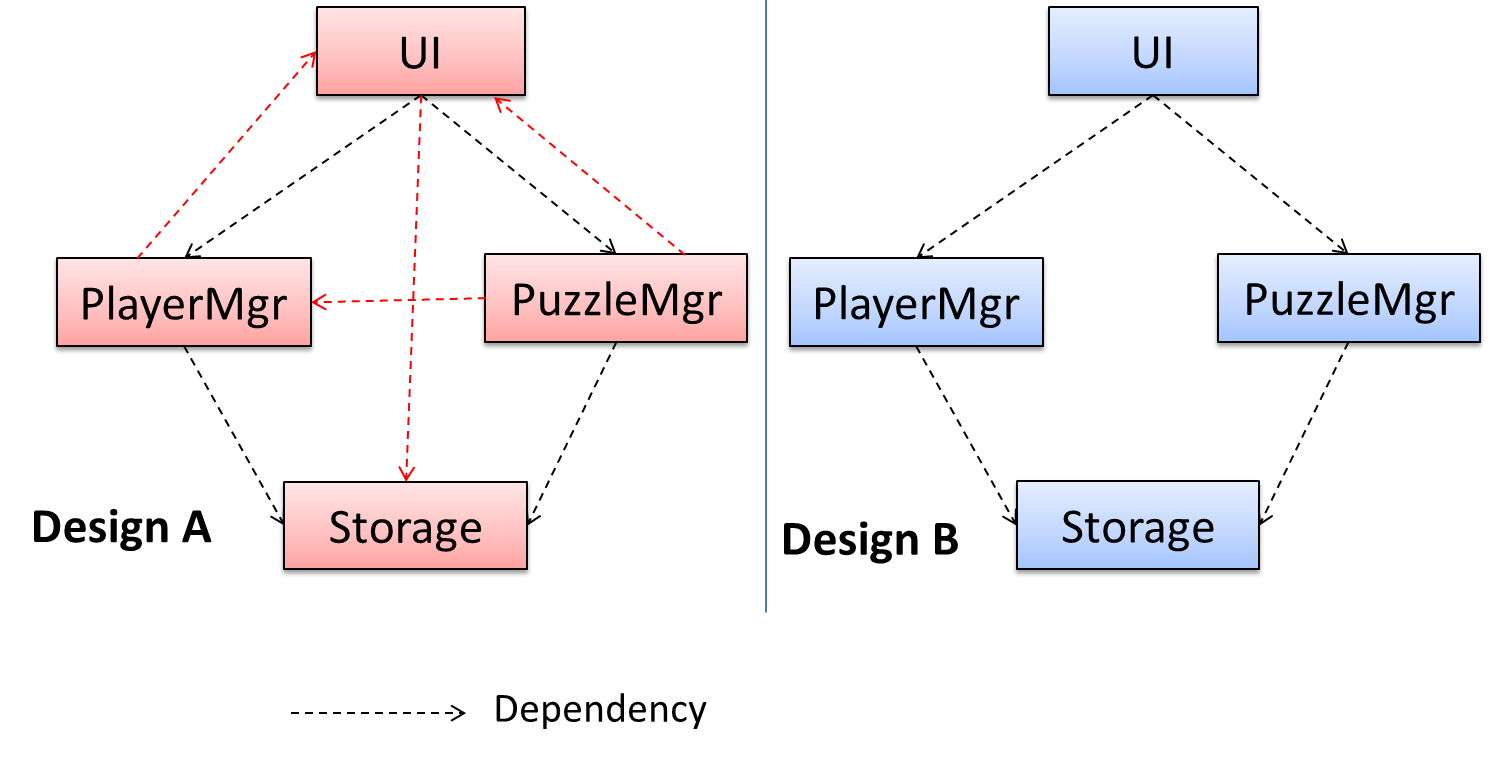
Coupling is a measure of the degree of dependence between components, classes, methods, etc. Low coupling indicates that a component is less dependent on other components. High coupling (aka tight coupling or strong coupling) is discouraged due to the following disadvantages:

  • Maintenance is harder because a change in one module could cause changes in other modules coupled to it (i.e. a ripple effect).
  • Integration is harder because multiple components coupled with each other have to be integrated at the same time.
  • Testing and reuse of the module is harder due to its dependence on other modules.

In the example below, design A appears to have more coupling between the components than design B.


Exercises:

Coupling levels of alternative designs


Regressions and coupling


Coupling and testability


Statements about coupling


W9.4c

Design → Design Fundamentals → Coupling → How

Can reduce coupling

X is coupled to Y if a change to Y can potentially require a change in X.

If the Foo class calls the method Bar#read(), Foo is coupled to Bar because a change to Bar can potentially (but not always) require a change in the Foo class e.g. if the signature of Bar#read() is changed, Foo needs to change as well, but a change to the Bar#write() method may not require a change in the Foo class because Foo does not call Bar#write().

code for the above example


Some examples of coupling: A is coupled to B if,

  • A has access to the internal structure of B (this results in a very high level of coupling)
  • A and B depend on the same global variable
  • A calls B
  • A receives an object of B as a parameter or a return value
  • A inherits from B
  • A and B are required to follow the same data format or communication protocol

Exercises:

Which indicate coupling?


W9.4d : OPTIONAL

Design → Design Fundamentals → Coupling → Types of coupling


Cohesion

W9.4e

Design → Design Fundamentals → Cohesion → What

Can explain cohesion

Cohesion is a measure of how strongly-related and focused the various responsibilities of a component are. A highly-cohesive component keeps related functionalities together while keeping out all other unrelated things.

Higher cohesion is better. Disadvantages of low cohesion (aka weak cohesion):

  • Lowers the understandability of modules as it is difficult to express module functionalities at a higher level.
  • Lowers maintainability because a module can be modified due to unrelated causes (reason: the module contains code unrelated to each other) or many modules may need to be modified to achieve a small change in behavior (reason: because the code related to that change is not localized to a single module).
  • Lowers reusability of modules because they do not represent logical units of functionality.

W9.4f

Design → Design Fundamentals → Cohesion → How

Can increase cohesion

Cohesion can be present in many forms. Some examples:

  • Code related to a single concept is kept together, e.g. the Student component handles everything related to students.
  • Code that is invoked close together in time is kept together, e.g. all code related to initializing the system is kept together.
  • Code that manipulates the same data structure is kept together, e.g. the GameArchive component handles everything related to the storage and retrieval of game sessions.

Suppose a Payroll application contains a class that deals with writing data to the database. If the class includes some code to show an error dialog to the user if the database is unreachable, that class is not cohesive because it seems to be interacting with the user as well as the database.


Exercises:

Which class is more cohesive?


Guidance for the item(s) below:

Given next are two design principles that we can apply when designing OOP systems. These aim to improve .

Some Principles

W9.4g

Principles → Single responsibility principle

Can explain single responsibility principle

Single responsibility principle (SRP): A class should have one, and only one, reason to change. -- Robert C. Martin

If a class has only one responsibility, it needs to change only when there is a change to that responsibility.

Consider a TextUi class that does parsing of the user commands as well as interacting with the user. That class needs to change when the formatting of the UI changes as well as when the syntax of the user command changes. Hence, such a class does not follow the SRP.

Gather together the things that change for the same reasons. Separate those things that change for different reasons. ―- Agile Software Development, Principles, Patterns, and Practices by Robert C. Martin


Resources:

W9.4h

Principles → Separation of concerns principle

Can explain separation of concerns principle

Separation of concerns principle (SoC): To achieve better modularity, separate the code into distinct sections, such that each section addresses a separate concern. -- Proposed by Edsger W. Dijkstra

A concern in this context is a set of information that affects the code of a computer program.

Examples for concerns:

  • A specific feature, such as the code related to the add employee feature
  • A specific aspect, such as the code related to persistence or security
  • A specific entity, such as the code related to the Employee entity

Applying reduces functional overlaps among code sections and also limits the ripple effect when changes are introduced to a specific part of the system.

If the code related to persistence is separated from the code related to security, a change to how the data are persisted will not need changes to how the security is implemented.

This principle can be applied at the class level, as well as at higher levels.

The n-tier architecture utilizes this principle. Each layer in the architecture has a well-defined functionality that has no functional overlap with each other.

This principle should lead to higher cohesion and lower coupling.


Exercises:

Correct statements about SoC


Follow up notes for the item(s) above:

As you may have realized already, the two principles given above are somewhat similar, one is specific to OOP and applied at class level while the other is not specific to OOP and can be applied at any level.

To learn more principles, you can go to https://se-education.org/se-book/principles/.

W9.4i

Principles → Liskov substitution principle

Can explain Liskov Substitution Principle

Liskov substitution principle (LSP): Derived classes must be substitutable for their base classes. -- proposed by Barbara Liskov

LSP sounds the same as substitutability but it goes beyond substitutability; LSP implies that a subclass should not be more restrictive than the behavior specified by the superclass. As you know, Java has language support for substitutability. However, if LSP is not followed, substituting a subclass object for a superclass object can break the functionality of the code.

Suppose the Payroll class depends on the adjustMySalary(int percent) method of the Staff class. Furthermore, the Staff class states that the adjustMySalary method will work for all positive percent values. Both the Admin and Academic classes override the adjustMySalary method.

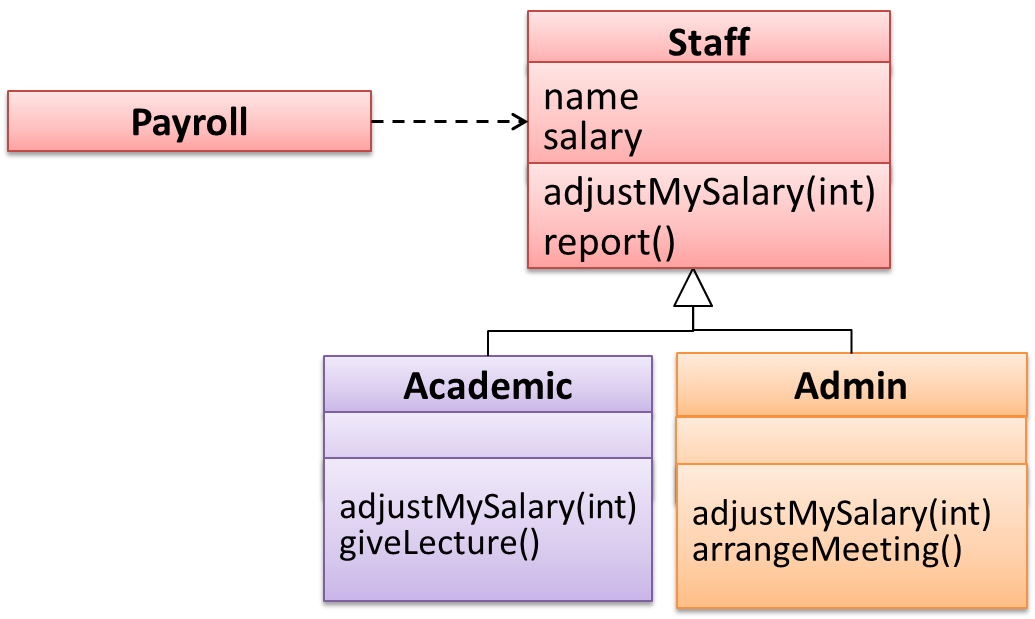
Now consider the following:

  • The Admin#adjustMySalary method works for both negative and positive percent values.
  • The Academic#adjustMySalary method works for percent values 1..100 only.

In the above scenario,

  • The Admin class follows LSP because it fulfills Payroll’s expectation of Staff objects (i.e. it works for all positive values). Substituting Admin objects for Staff objects will not break the Payroll class functionality.
  • The Academic class violates LSP because it will not work for percent values over 100 as expected by the Payroll class. Substituting Academic objects for Staff objects can potentially break the Payroll class functionality.

Another example


Exercises:

Is this LSP?


Guidance for the item(s) below:

We started writing JUnit testing in the last week. The topics below helps you push a bit further in the same direction.

[W9.5] Testing: Intermediate Techniques

W9.5a

Quality Assurance → Testing → Introduction → Testability

Can explain testability

Testability is an indication of how easy it is to test an SUT. As testability depends a lot on the design and implementation, you should try to increase the testability when you design and implement software. The higher the testability, the easier it is to achieve better quality software.


W9.5b : OPTIONAL

C++ to Java → JUnit → JUnit: Intermediate


W9.5c : OPTIONAL

Quality Assurance → Testing → Test-Driven Development → What