This site is from a past semester! The current version will be here when the new semester starts.

Week 3 [Fri, Jan 26th] - Topics

Detailed Table of Contents


Guidance for the item(s) below:

As you know, OOP is a core part of this course. Let's start learning the OOP paradigm this week.

[W3.1] OOP: Classes and Objects

W3.1a

Paradigms → OOP → Introduction → What

Can describe OOP at a higher level

Object-Oriented Programming (OOP) is a programming paradigm. A programming paradigm guides programmers to analyze programming problems, and structure programming solutions, in a specific way.

Programming languages have traditionally divided the world into two parts—data and operations on data. Data is static and immutable, except as the operations may change it. The procedures and functions that operate on data have no lasting state of their own; they’re useful only in their ability to affect data.

This division is, of course, grounded in the way computers work, so it’s not one that you can easily ignore or push aside. Like the equally pervasive distinctions between matter and energy and between nouns and verbs, it forms the background against which you work. At some point, all programmers—even object-oriented programmers—must lay out the data structures that their programs will use and define the functions that will act on the data.

With a procedural programming language like C, that’s about all there is to it. The language may offer various kinds of support for organizing data and functions, but it won’t divide the world any differently. Functions and data structures are the basic elements of design.

Object-oriented programming doesn’t so much dispute this view of the world as restructure it at a higher level. It groups operations and data into modular units called objects and lets you combine objects into structured networks to form a complete program. In an object-oriented programming language, objects and object interactions are the basic elements of design.

-- Object-Oriented Programming with Objective-C, Apple

Some other examples of programming paradigms are:

Paradigm Programming Languages
Procedural Programming paradigm C
Functional Programming paradigm F#, Haskell, Scala
Logic Programming paradigm Prolog

Some programming languages support multiple paradigms.

Java is primarily an OOP language but it supports limited forms of functional programming and it can be used to (although not recommended to) write procedural code. e.g. se-edu/addressbook-level1

JavaScript and Python support functional, procedural, and OOP programming.


Exercises:

Statements about OOP


Procedural vs OOP


W3.1b

Paradigms → OOP → Objects → What

Can describe how OOP relates to the real world

An object in Object-Oriented Programming (OOP) has state and behavior, similar to objects in the real world.

Every object has both state (data) and behavior (operations on data). In that, they’re not much different from ordinary physical objects. It’s easy to see how a mechanical device, such as a pocket watch or a piano, embodies both state and behavior. But almost anything that’s designed to do a job does, too. Even simple things with no moving parts such as an ordinary bottle combine state (how full the bottle is, whether or not it’s open, how warm its contents are) with behavior (the ability to dispense its contents at various flow rates, to be opened or closed, to withstand high or low temperatures).

It’s this resemblance to real things that gives objects much of their power and appeal. They can not only model components of real systems, but equally as well fulfill assigned roles as components in software systems.

-- Object-Oriented Programming with Objective-C, Apple

OOP views the world as a network of interacting objects.

A real world scenario viewed as a network of interacting objects:

You are asked to find out the average age of a group of people Adam, Beth, Charlie, and Daisy. You take a piece of paper and pen, go to each person, ask for their age, and note it down. After collecting the age of all four, you enter it into a calculator to find the total. And then, use the same calculator to divide the total by four, to get the average age. This can be viewed as the objects You, Pen, Paper, Calculator, Adam, Beth, Charlie, and Daisy interacting to accomplish the end result of calculating the average age of the four persons. These objects can be considered as connected in a certain network of certain structure that dictates how these objects can interact. For example, You object is connected to the Pen object, and hence You can use the Pen object to write.

OOP solutions try to create a similar object network inside the computer’s memory – a sort of virtual simulation of the corresponding real world scenario – so that a similar result can be achieved programmatically.

OOP does not demand that the virtual world object network follow the real world exactly.

Our previous example can be tweaked a bit as follows:

  • Use an object called Main to represent your role in the scenario.
  • As there is no physical writing involved, you can replace the Pen and Paper with an object called AgeList that is able to keep a list of ages.

Every object has both state (data) and behavior (operations on data).

The state and behavior of our running example are as follows:

Object Real World? Virtual World? Example of State (i.e. Data) Examples of Behavior (i.e. Operations)
Adam Name, Date of Birth Calculate age based on birthday
Pen - Ink color, Amount of ink remaining Write
AgeList - Recorded ages Give the number of entries, Accept an entry to record
Calculator Numbers already entered Calculate the sum, divide
You/Main Average age, Sum of ages Use other objects to calculate

Every object has an interface and an implementation.

Every real world object has,

  • an interface through which other objects can interact with it, and,
  • an implementation that supports the interface but may not be accessible to the other object.

The interface and implementation of some real-world objects in our example:

  • Calculator: the buttons and the display are part of the interface; circuits are part of the implementation.
  • Adam: In the context of our 'calculate average age' example,
    • the interface of Adam consists of requests that Adam will respond to, e.g. "Give age to the nearest year, as at Jan 1st of this year" "State your name".
    • the implementation includes the mental calculation Adam uses to calculate the age which is not visible to other objects.

Similarly, every object in the virtual world has an interface and an implementation.

The interface and implementation of some virtual-world objects in our example:

  • Adam: the interface might have a method getAge(Date asAt); the implementation of that method is not visible to other objects.

Objects interact by sending messages. Both real world and virtual world object interactions can be viewed as objects sending messages to each other. The message can result in the sender object receiving a response and/or the receiver object’s state being changed. Furthermore, the result can vary based on which object received the message, even if the message is identical (see rows 1 and 2 in the example below).

Same messages and responses from our running example:

World Sender Receiver Message Response State Change
Real You Adam "What is your name?" "Adam" -
Real as above Beth as above "Beth" -
Real You Pen Put nib on paper and apply pressure Makes a mark on your paper Ink level goes down
Virtual Main Calculator (current total is 50) add(int i): int i = 23 73 total = total + 23

Exercises:

Describe objects in the given scenario


W3.1c

Paradigms → OOP → Classes → What

Can explain the relationship between classes and objects

Writing an OOP program is essentially writing instructions that the computer will use to,

  1. create the virtual world of the object network, and
  2. provide it the inputs to produce the outcome you want.

A class contains instructions for creating a specific kind of objects. It turns out sometimes multiple objects keep the same type of data and have the same behavior because they are of the same kind. Instructions for creating a 'kind' (or ‘class’) of objects can be done once and those same instructions can be used to objects of that kind. We call such instructions a Class.

Classes and objects in an example scenario

Consider the example of writing an OOP program to calculate the average age of Adam, Beth, Charlie, and Daisy.

Instructions for creating objects Adam, Beth, Charlie, and Daisy will be very similar because they are all of the same kind: they all represent ‘persons’ with the same interface, the same kind of data (i.e. name, dateOfBirth, etc.), and the same kind of behavior (i.e. getAge(Date), getName(), etc.). Therefore, you can have a class called Person containing instructions on how to create Person objects and use that class to instantiate objects Adam, Beth, Charlie, and Daisy.

Similarly, you need classes AgeList, Calculator, and Main classes to instantiate one each of AgeList, Calculator, and Main objects.

Class Objects
Person objects representing Adam, Beth, Charlie, Daisy
AgeList an object to represent the age list
Calculator an object to do the calculations
Main an object to represent you (i.e., the one who manages the whole operation)

Exercises:

Identify Classes and Objects


Classes for CityConnect app


Guidance for the item(s) below:

OOP is built upon four core concepts. The firs two are:

  1. abstraction
  2. encapsulation
  3. ...
  4. ...

They are explained in the sections below.

W3.1d

Paradigms → OOP → Objects → Objects as abstractions

Can explain the abstraction aspect of OOP

The concept of Objects in OOP is an abstraction mechanism because it allows us to abstract away the lower level details and work with bigger granularity entities i.e. ignore details of data formats and the method implementation details and work at the level of objects.

You can deal with a Person object that represents the person Adam and query the object for Adam's age instead of dealing with details such as Adam’s date of birth (DoB), in what format the DoB is stored, the algorithm used to calculate the age from the DoB, etc.


W3.1e

Paradigms → OOP → Objects → Encapsulation of objects

Can explain the encapsulation aspect of OOP

Encapsulation protects an implementation from unintended actions and from inadvertent access.
-- Object-Oriented Programming with Objective-C, Apple

An object is an encapsulation of some data and related behavior in terms of two aspects:

1. The packaging aspect: An object packages data and related behavior together into one self-contained unit.

2. The information hiding aspect: The data in an object is hidden from the outside world and are only accessible using the object's interface.


Exercises:

Choose the correct statement


Guidance for the item(s) below:

Now that you know what objects are, let's see how they are used in Java, which happens to be an OOP language.

[W3.2] Java: Objects

W3.2a

C++ to Java → Objects → Using Java objects

Can use in-built Java objects

Java is an "object-oriented" language, which means that it uses objects to represent data and provide methods related to them. Object types are called classes e.g., you can use String objects in Java and those objects belong to the String class.

importing

Java comes with many inbuilt classes which are organized into packages. Here are some examples:

package Some example classes in the package
java.lang String, Math, System

Before using a class in your code, you need to import the class. import statements appear at the top of the code.

This example imports the java.awt.Point class (i.e., the Point class in the java.awt package) -- which can be used to represent the coordinates of a location in a Cartesian plane -- and use it in the main method.

import java.awt.Point;

public class Main{
    public static void main(String[] args) {
        Point spot = new Point(3, 4);
        int x = spot.x;
        System.out.println(x);
   }
}

You might wonder why we can use the System class without importing it. System belongs to the java.lang package, which is imported automatically.

new operator

To create a new object, you have to use the new operator

This line shows how to create a new Point object using the new operator:

Point spot = new Point(3, 4);

Exercises:

[Key Exercise] create Rectangle objects

Update the code below to create a new Rectangle object as described in the code comments, to produce the given output.

  • The Rectangle class is found in the java.awt package.
  • The parameters you need to supply when creating new Rectangle objects are (int x, int y, int width, int height).
public class Main {
    public static void main(String[] args) {
        Rectangle r;

        // TODO: create a Rectangle object that has the
        // properties x=0, y=0, width=5, height=10
        // and assign it to r
        System.out.println(r);
    }
}

java.awt.Rectangle[x=0,y=0,width=5,height=10]

Hint


W3.2b

C++ to Java → Objects → Instance members

Can use instance members of objects

Variables that belong to an object are called attributes (or fields).

To access an attribute of an object, Java uses dot notation.

The code below uses spot.x which means "go to the object spot refers to, and get the value of the attribute x."

Point spot = new Point(3, 4);
int sum = spot.x * spot.x + spot.y * spot.y;
System.out.println(spot.x + ", " + spot.y + ", " + sum);

3, 4, 25

You can an object by assigning a different value to its attributes.

This example changes the x value of the Point object to 5.

Point spot = new Point(3, 4);
spot.x = 5;
System.out.println(spot.x + ", " + spot.y);

5, 4

Java uses the dot notation to invoke methods on an object too.

This example invokes the translate method on a Point object so that it moves to a different location.

Point spot = new Point(3, 4);
System.out.println(spot.x + ", " + spot.y);
spot.translate(5,5);
System.out.println(spot.x + ", " + spot.y);

3, 4
8, 9

Exercises:

[Key Exercise] use Rectangle objects

Update the code below as described in code comments, to produce the given output.

import java.awt.Rectangle;

public class Main {
    public static void main(String[] args) {
        Rectangle r = new Rectangle(0, 0, 4, 6);
        System.out.println(r);

        int area;
        //TODO: add a line below to calculate the area using
        //  width and height properties of r
        //  and assign it to the variable area

        System.out.println("Area: " + area);

        //TODO: add a line here to set the size of r to
        //  8x10 (width x height)
        //Recommended: use the setSize(int width, int height)
        //  method of the Rectangle object

        System.out.println(r);
    }

}

java.awt.Rectangle[x=0,y=0,width=4,height=6]
Area: 24
java.awt.Rectangle[x=0,y=0,width=8,height=10]

Hint


W3.2c

C++ to Java → Objects → Passing objects around

Can pass objects between methods

You can pass objects as parameters to a method in the usual way.

The printPoint method below takes a Point object as an argument and displays its attributes in (x,y) format.

public static void printPoint(Point p) {
    System.out.println("(" + p.x + ", " + p.y + ")");
}

public static void main(String[] args) {
    Point spot = new Point(3, 4);
    printPoint(spot);
}

(3, 4)

You can return an object from a method too.

The java.awt package also provides a class called Rectangle. Rectangle objects are similar to points, but they have four attributes: x, y, width, and height. The findCenter method below takes a Rectangle as an argument and returns a Point that corresponds to the center of the rectangle:

public static Point findCenter(Rectangle box) {
    int x = box.x + box.width / 2;
    int y = box.y + box.height / 2;
    return new Point(x, y);
}

The return type of this method is Point. The last line creates a new Point object and returns a reference to it.

null and NullPointerException

null is a special value that means "no object". You can assign null to a variable to indicate that the variable is 'empty' at the moment. However, if you try to use a null value, either by accessing an attribute or invoking a method, Java throws a NullPointerException.

In this example, the variable spot is assigned a null value. As a result, trying to access spot.x attribute or invoking the spot.translate method results in a NullPointerException.

Point spot = null;
int x = spot.x;          // NullPointerException
spot.translate(50, 50);  // NullPointerException

On the other hand, it is legal to return null from a method or to pass a null reference as an argument to a method.

Returning null from a method.

public static Point createCopy(Point p) {
    if (p == null) {
        return null; // return null if p is null
    }

    // create a new object with same x,y values
    return new Point(p.x, p.y);
}

Passing null as the argument.

Point result = createCopy(null);
System.out.println(result);

null

It is possible to have multiple variables that refer to the same object.

Notice how p1 and p2 are aliases for the same object. When the object is changed using the variable p1, the changes are visible via p2 as well (and vice versa), because they both point to the same Point object.

Point p1 = new Point(0,0);
Point p2 = p1;
System.out.println("p1: " + p1.x + ", " + p1.y);
System.out.println("p2: " + p2.x + ", " + p2.y);
p1.x = 1;
p2.y = 2;
System.out.println("p1: " + p1.x + ", " + p1.y);
System.out.println("p2: " + p2.x + ", " + p2.y);

p1: 0, 0
p2: 0, 0
p1: 1, 2
p2: 1, 2

Java does not have explicit pointers (and other related things such as pointer de-referencing and pointer arithmetic). When an object is passed into a method as an argument, the method gains access to the original object. If the method changes the object it received, the changes are retained in the object even after the method has completed.

Note how p3 retains changes done to it by the method swapCoordinates even after the method has completed executing.

public static void swapCoordinates(Point p){
    int temp = p.x;
    p.x = p.y;
    p.y = temp;
}

public static void main(String[] args) {
    Point p3 = new Point(2,3);
    System.out.println("p3: " + p3.x + ", " + p3.y);
    swapCoordinates(p3);
    System.out.println("p3: " + p3.x + ", " + p3.y);
}
p3: 2, 3
p3: 3, 2

Exercises:

[Key Exercise] pass objects to move method

Add a method move(Point p, Rectangle r) to the code below, to produce the given output. The behavior of the method is as follows:

  • Returns null and does nothing if either p or r is null
  • Returns a new Point object that has attributes x and y that match those of r
  • Does not modify p
  • Updates r so that its attributes x and y match those of p
import java.awt.Point;
import java.awt.Rectangle;

public class Main {

    //TODO add your method here

    public static void main(String[] args) {
        Point p1 = new Point(0, 0);
        Rectangle r1 = new Rectangle(2, 3, 5, 6);
        System.out.println("arguments: " + p1 + ", " + r1);

        Point p2 = move(p1, r1);
        System.out.println(
                "argument point after method call: " + p1);
        System.out.println(
                "argument rectangle after method call: " + r1);
        System.out.println(
                "returned point: " + p2);

        System.out.println(move(null, null));
    }
}

arguments: java.awt.Point[x=0,y=0], java.awt.Rectangle[x=2,y=3,width=5,height=6]
argument point after method call: java.awt.Point[x=0,y=0]
argument rectangle after method call: java.awt.Rectangle[x=0,y=0,width=5,height=6]
returned point: java.awt.Point[x=2,y=3]
null

Hint


W3.2d

C++ to Java → Objects → Garbage collection

Can explain Java garbage collection

What happens when no variables refer to an object?

Point spot = new Point(3, 4);
spot = null;

The first line creates a new Point object and makes spot refer to it. The second line changes spot so that instead of referring to the object, it refers to nothing. If there are no references to an object, there is no way to access its attributes or invoke a method on it. From the programmer’s view, it ceases to exist. However, it’s still present in the computer’s memory, taking up space.

In Java, you don’t have to delete objects you create when they are no longer needed. As your program runs, the system automatically looks for stranded objects and reclaims them; then the space can be reused for new objects. This process is called garbage collection. You don’t have to do anything to make garbage collection happen, and in general don’t have to be aware of it. But in high-performance applications, you may notice a slight delay every now and then when Java reclaims space from discarded objects.


Guidance for the item(s) below:

Having seen how to use objects in Java, the next step is learn how to define new kinds of objects (aka classes) in Java.

[W3.3] Java: Classes

W3.3a

C++ to Java → Classes → Defining classes

Can define Java classes

As you know,

  • Defining a class introduces a new object type.
  • Every object belongs to some object type; that is, it is an instance of some class.
  • A class definition is like a template for objects: it specifies what attributes the objects have and what methods they have.
  • The new operator instantiates objects, that is, it creates new instances of a class.
  • The methods that operate on an object type are defined in the class for that object.

Here's a class called Time, intended to represent a moment in time. It has three attributes and no methods.

public class Time {
    private int hour;
    private int minute;
    private int second;
}

You can give a class any name you like. The Java convention is to use format for class names.

The code is placed in a file whose name matches the class e.g., the Time class should be in a file named Time.java.

When a class is public (e.g., the Time class in the above example) it can be used in other classes. But the that are private (e.g., the hour, minute and second attributes of the Time class) can only be accessed from inside the Time class.

Constructors

The syntax for is similar to that of other methods, except:

  • The name of the constructor is the same as the name of the class.
  • The keyword static is omitted.
  • Does not return anything. A constructor returns the created object by default.

When you invoke new, Java creates the object and calls your constructor to initialize the instance variables. When the constructor is done, it returns a reference to the new object.

Here is an example constructor for the Time class:

public Time() {
    hour = 0;
    minute = 0;
    second = 0;
}

This constructor does not take any arguments. Each line initializes an instance variable to 0 (which in this example means midnight). Now you can create Time objects.

Time time = new Time();

Like other methods, constructors can be .

You can add another constructor to the Time class to allow creating Time objects that are initialized to a specific time:

public Time(int h, int m, int s) {
    hour = h;
    minute = m;
    second = s;
}

Here's how you can invoke the new constructor: Time justBeforeMidnight = new Time(11, 59, 59);

this keyword

The this keyword is a reference variable in Java that refers to the . You can use this the same way you use the name of any other object. For example, you can read and write the instance variables of this, and you can pass this as an argument to other methods. But you do not declare this, and you can’t make an assignment to it.

In the following version of the constructor, the names and types of the parameters are the same as the instance variables (parameters don’t have to use the same names, but that’s a common style). As a result, the parameters shadow (or hide) the instance variables, so the keyword this is necessary to tell them apart.

public Time(int hour, int minute, int second) {
    this.hour = hour;
    this.minute = minute;
    this.second = second;
}

this can be used to refer to a constructor of a class within the same class too.

In this example the constructor Time() uses the this keyword to call its own constructor Time(int, int, int)

public Time() {
    this(0, 0, 0); // call the overloaded constructor
}

public Time(int hour, int minute, int second) {
    // ...
}

Instance methods

You can add methods to a class which can then be used from the objects of that class. These instance methods do not have the static keyword in the method signature. Instance methods can access attributes of the class.

Here's how you can add a method to the Time class to get the number of seconds passed till midnight.

public int secondsSinceMidnight() {
    return hour*60*60 + minute*60 + second;
}

Here's how you can use that method.

Time t = new Time(0, 2, 5);
System.out.println(t.secondsSinceMidnight() + " seconds since midnight!");

Exercises:

[Key Exercise] define a Circle class

Define a Circle class so that the code given below produces the given output. The nature of the class is as follows:

  • Attributes(all private):
    • int x, int y: represents the location of the circle
    • double radius: the radius of the circle
  • Constructors:
    • Circle(): initializes x, y, radius to 0
    • Circle(int x, int y, double radius): initializes the attributes to the given values
  • Methods:
    • getArea(): int
      Returns the area of the circle as an int value (not double). Calculated as Pi * (radius)2
      You can convert a double to an int using (int) e.g., x = (int)2.25 gives x the value 2.
      You can use Math.PI to get the value of Pi
      You can use Math.pow() to raise a number to a specific power e.g., Math.pow(3, 2) calculates 32
public class Main {
    public static void main(String[] args) {
        Circle c = new Circle();

        System.out.println(c.getArea());
        c = new Circle(1, 2, 5);
        System.out.println(c.getArea());

    }
}

0
78

Hint


W3.3b

C++ to Java → Classes → Getters and setters

Can define getters and setters

As the instance variables of Time are private, you can access them from within the Time class only. To compensate, you can provide methods to access attributes:

public int getHour() {
    return hour;
}

public int getMinute() {
    return minute;
}

public int getSecond() {
    return second;
}

Methods like these are formally called “accessors”, but more commonly referred to as getters. By convention, the method that gets a variable named something is called getSomething.

Similarly, you can provide setter methods to modify attributes of a Time object:

public void setHour(int hour) {
    this.hour = hour;
}

public void setMinute(int minute) {
    this.minute = minute;
}

public void setSecond(int second) {
    this.second = second;
}

Exercises:

[Key Exercise] add getters/setters to the Circle class

Consider the Circle class below:

public class Circle {
    private int x;
    private int y;
    private double radius;

    public Circle(){
        this(0, 0, 0);
    }

    public Circle(int x, int y, double radius){
        this.x = x;
        this.y = y;
        this.radius = radius;
    }

    public int getArea(){
        double area = Math.PI * Math.pow(radius, 2);
        return (int)area;
    }

}

Update it as follows so that code given below produces the given output.

  • Add getter/setter methods for all three attributes
  • Update the setters and constructors such that if the radius supplied is negative, the code automatically set the radius to 0 instead.
public class Main {
    public static void main(String[] args) {
        Circle c = new Circle(1,2, 5);

        c.setX(4);
        c.setY(5);
        c.setRadius(6);
        System.out.println("x      : " + c.getX());
        System.out.println("y      : " + c.getY());
        System.out.println("radius : " + c.getRadius());
        System.out.println("area   : " + c.getArea());

        c.setRadius(-5);
        System.out.println("radius : " + c.getRadius());
        c = new Circle(1, 1, -4);
        System.out.println("radius : " + c.getRadius());

    }
}

x      : 4
y      : 5
radius : 6.0
area   : 113
radius : 0.0
radius : 0.0

Hint


Guidance for the item(s) below:

You learned that objects can have members (methods, attributes). Well, there is something called class-level members too. Let's learn what they are, how they differ from the former, and how to implement them in Java.

[W3.4] OOP, Java: Class-Level Members

W3.4a

Paradigms → OOP → Classes → Class-level members

Can explain class-level members

While all objects of a class have the same attributes, each object has its own copy of the attribute value.

All Person objects have the name attribute but the value of that attribute varies between Person objects.

However, some attributes are not suitable to be maintained by individual objects. Instead, they should be maintained centrally, shared by all objects of the class. They are like ‘global variables’ but attached to a specific class. Such variables whose value is shared by all instances of a class are called class-level attributes.

The attribute totalPersons should be maintained centrally and shared by all Person objects rather than copied at each Person object.

Similarly, when a normal method is being called, a message is being sent to the receiving object and the result may depend on the receiving object.

Sending the getName() message to the Adam object results in the response "Adam" while sending the same message to the Beth object results in the response "Beth".

However, there can be methods related to a specific class but not suitable for sending messages to a specific object of that class. Such methods that are called using the class instead of a specific instance are called class-level methods.

The method getTotalPersons() is not suitable to send to a specific Person object because a specific object of the Person class should not have to know about the total number of Person objects.

Class-level attributes and methods are collectively called class-level members (also called static members sometimes because some programming languages use the keyword static to identify class-level members). They are to be accessed using the class name rather than an instance of the class.


Exercises:

Suitable as class-level variables


W3.4b

C++ to Java → Classes → Class-level members

Can use class-level members

The content below is an extract from -- Java Tutorial, with slight adaptations.

When a number of objects are created from the same class blueprint, they each have their own distinct copies of instance variables. In the case of a Bicycle class, the instance variables are gear, and speed. Each Bicycle object has its own values for these variables, stored in different memory locations.

Sometimes, you want to have variables that are common to all objects. This is accomplished with the static modifier. Fields that have the static modifier in their declaration are called static fields or class variables. They are associated with the class, rather than with any object. Every instance of the class shares a class variable, which is in one fixed location in memory. Any object can change the value of a class variable, but class variables can also be manipulated without creating an instance of the class.

Suppose you want to create a number of Bicycle objects and assign each a serial number, beginning with 1 for the first object. This ID number is unique to each object and is therefore an instance variable. At the same time, you need a field to keep track of how many Bicycle objects have been created so that you know what ID to assign to the next one. Such a field is not related to any individual object, but to the class as a whole. For this you need a class variable, numberOfBicycles, as follows:

public class Bicycle {

    private int gear;
    private int speed;

    // an instance variable for the object ID
    private int id;

    // a class variable for the number of Bicycle
    //   objects instantiated
    private static int numberOfBicycles = 0;
        ...
}

Class variables are referenced by the class name itself, as in Bicycle.numberOfBicycles This makes it clear that they are class variables.

The Java programming language supports static methods as well as static variables. Static methods, which have the static modifier in their declarations, should be invoked with the class name, without the need for creating an instance of the class, as in ClassName.methodName(args)

The static modifier, in combination with the final modifier, is also used to define constants. The final modifier indicates that the value of this field cannot change. For example, the following variable declaration defines a constant named PI, whose value is an approximation of pi (the ratio of the circumference of a circle to its diameter): static final double PI = 3.141592653589793;

Here is an example with class-level variables and class-level methods:

public class Bicycle {

    private int gear;
    private int speed;

    private int id;

    private static int numberOfBicycles = 0;


    public Bicycle(int startSpeed, int startGear) {
        gear = startGear;
        speed = startSpeed;

        numberOfBicycles++;
        id = numberOfBicycles;
    }

    public int getID() {
        return id;
    }

    public static int getNumberOfBicycles() {
        return numberOfBicycles;
    }

    public int getGear(){
        return gear;
    }

    public void setGear(int newValue) {
        gear = newValue;
    }

    public int getSpeed() {
        return speed;
    }

    // ...

}

Explanation of System.out.println(...):

  • out is a class-level public attribute of the System class.
  • println is an instance level method of the out object.

Exercises:

[Key Exercise] add getMaxRadius to the Circle class

Consider the Circle class below:

public class Circle {
    private int x;
    private int y;
    private double radius;

    public Circle(){
        this(0, 0, 0);
    }

    public Circle(int x, int y, double radius){
        setX(x);
        setY(y);
        setRadius(radius);
    }

    public int getX() {
        return x;
    }

    public void setX(int x) {
        this.x = x;
    }

    public int getY() {
        return y;
    }

    public void setY(int y) {
        this.y = y;
    }

    public double getRadius() {
        return radius;
    }

    public void setRadius(double radius) {
        this.radius = Math.max(radius, 0);
    }

    //TODO: Add your getMaxRadius() method here
}

Update it as follows so that code given below produces the given output.

  • Add a class-level maxRadius variable to store the maximum radius value of the Circle objects in existence thus far.
  • Add a class-level getMaxRadius() method that uses the above-mentioned variable to return the maximum radius value of the Circle objects in existence thus far.
  • Remember to update the setRadius method to ensure maxRadius value is updated (if needed) when the radius of an existing Circle object is changed.
public class Main {
    public static void main(String[] args) {
        Circle c = new Circle();
        System.out.println("max radius used so far : " + Circle.getMaxRadius());
        c = new Circle(0, 0, 10);
        System.out.println("max radius used so far : " + Circle.getMaxRadius());
        c = new Circle(0, 0, -15);
        System.out.println("max radius used so far : " + Circle.getMaxRadius());
        c.setRadius(12);
        System.out.println("max radius used so far : " + Circle.getMaxRadius());
    }
}

max radius used so far : 0.0
max radius used so far : 10.0
max radius used so far : 12.0

Hint


Guidance for the item(s) below:

While you can (and will be) defining your own classes, Java comes with a whole bunch of built-in classes that you can use right-away. Let's learn about some of the most useful such built-in classes next.

[W3.5] Java: Useful Classes

W3.5a

Implementation → Reuse → APIs → What

Can explain APIs

An Application Programming Interface (API) specifies the interface through which other programs can interact with a software component. It is a contract between the component and its clients.

A class has an API (e.g., API of the Java String class, API of the Python str class) which is a collection of public methods that you can invoke to make use of the class.

The GitHub API is a collection of web request formats that the GitHub server accepts and their corresponding responses. You can write a program that interacts with GitHub through that API.

When developing large systems, if you define the API of each component early, the development team can develop the components in parallel because the future behavior of the other components are now more predictable.


Exercises:

Statements about APIs


True or False?


W3.5b

C++ to Java → Some Useful Classes → Java API

Can use Java API documentation about classes

Java comes with a rich collection of classes that you can use. They form what is known as the Java API (Application Programming Interface). Each class in the API comes with documentation in a standard format.


W3.5c

C++ to Java → Some Useful Classes → The String class

Can use the String class

String is a built-in Java class that you can use without importing. Given below are some useful String methods:

Find characters of a string

Strings provide a method named charAt, which extracts a character. It returns a char, a primitive type that stores an individual character (as opposed to strings of them).

String fruit = "banana";
char letter = fruit.charAt(0);

The argument 0 means that we want the letter at position 0. Like array indexes, string indexes start at 0, so the character assigned to letter is 'b'.

You can convert a string to an array of characters using the toCharArray method.

char[] fruitChars = fruit.toCharArray()
Change a string to upper/lower case

Strings provide methods, toUpperCase and toLowerCase, that convert from uppercase to lowercase and back.

After these statements run, upperName refers to the string "ALAN TURING" but name still refers to "Alan Turing".

String name = "Alan Turing";
String upperName = name.toUpperCase();
System.out.println(name);
System.out.println(upperName);

Alan Turing
ALAN TURING

Note that a string method cannot change the string object on which the method is invoked, because strings are . For example, when you invoke toUpperCase on a string "abc", you get a new string object "ABC" as the return value rather than the string "abc" being changed to "ABC". As a result, for such string methods that seemingly modify the string but actually return a new string instead e.g., toLowerCase, invoking the method has no effect if you don’t assign the return value to a variable.

String s = "Ada";
s.toUpperCase(); // no effect
s = s.toUpperCase(); // the correct way
Replacing parts of a string

Another useful method is replace, which finds and replaces instances of one string within another.

This example replaces "Computer Science" with "CS".

String text = "Computer Science is fun!";
text = text.replace("Computer Science", "CS");
System.out.println(text);

CS is fun!
Accessing substrings

The substring method returns a new string that copies letters from an existing string, starting at the given index.

  • "banana".substring(0) "banana"
  • "banana".substring(2) "nana"
  • "banana".substring(6) ""

If it’s invoked with two arguments, they are treated as a start and end index:

  • "banana".substring(0, 3) "ban"
  • "banana".substring(2, 5) "nan"
  • "banana".substring(6, 6) ""
Searching within strings

The indexOf method searches for a single character (or a substring) in a string and returns the index of the first occurrence. The method returns -1 if there are no occurrences.

  • "banana".indexOf('a') 1
  • "banana".indexOf('a', 2) 3 searches for 'a', starting from position 2
  • "banana".indexOf('x') -1
  • "banana".indexOf("nan") 2 searches for the substring "nan"
Comparing strings

To compare two strings, it is tempting to use the == and != operators.

String name1 = "Alan Turing";
String name2 = "Alan Turing";
System.out.println(name1 == name2);

This code compiles and runs, and most of the time it shows true. But it is not correct. The problem is, , the == operator checks whether the two variables refer to the same object (by comparing the references). If you give it two different string objects that contain the same letters, it is supposed to yield false because they are two distinct objects even if they contain the same text. However, because Java strings are immutable, in some cases (but not always) Java reuses existing string objects instead of creating multiple objects, which can cause the above code to yield true. Therefore, it is not safe to use == to compare strings if your intention is to check if they contain the same text.

The right way to compare strings is with the equals method.

This example invokes equals on name1 and passes name2 as an argument. The equals method returns true if the strings contain the same characters; otherwise it returns false.

if (name1.equals(name2)) {
    System.out.println("The names are the same.");
}

If the strings differ, you can use compareTo to see which comes first in alphabetical order. The return value from compareTo is the difference between the first characters in the strings that differ. If the strings are equal, their difference is zero. If the first string (the one on which the method is invoked) comes first in the alphabet, the difference is negative. Otherwise, the difference is positive.

In this example, compareTo returns positive 8, because the second letter of "Alan" comes 8 letters after the second letter of "Ada".

String name1 = "Alan";
String name2 = "Ada";
int diff = name1.compareTo(name2);
if (diff == 0) {
    System.out.println("The names are the same.");
} else if (diff < 0) {
    System.out.println("name1 comes before name2.");
} else if (diff > 0) {
    System.out.println("name2 comes before name1.");
}

Both equals and compareTo are case-sensitive. The uppercase letters come before the lowercase letters, so "Ada" comes before "ada". To check if two strings are similar irrespective of the differences in case, you can use the equalsIgnoreCase method.

String s1 = "Apple";
String s2 = "apple";
System.out.println(s1.equals(s2)); //false
System.out.println(s1.equalsIgnoreCase(s2)); //true

Some more comparison-related String methods:

  • contains: checks if one string is a sub-string of the other e.g., Snapple and app
  • startsWith: checks if one string has the other as a substring at the beginning e.g., Apple and App
  • endsWith: checks if one string has the other as a substring at the end e.g., Crab and ab
Printing special characters (line breaks, tabs, ...)

You can embed a special character e.g., line break, tab, backspace, etc. in a string using an escape sequence.

Escape sequence meaning
\n newline character
\t tab character
\b backspace character
\f form feed character
\r carriage return character
\" " (double quote) character
\' ' (single quote) character
\\ \ (back slash) character
\uDDDD character from the Unicode character set, by specifying the Unicode as four hex digits in the place of DDDD

An example of using escape sequences to print some special characters.

System.out.println("First line\nSecond \"line\"");

First line
Second "line"

As the behavior of the \n , the recommended way to print a line break is using the System.lineSeparator() as it works the same in all platforms.

Using System.lineSeparator() to print a line break.

System.out.println("First" + System.lineSeparator() + "Second");

First
Second
String formatting

Sometimes programs need to create strings that are formatted in a certain way. String.format takes a format specifier followed by a sequence of values and returns a new string formatted as specified.

The following method returns a time string in 12-hour format. The format specifier \%02d means “two digit integer padded with zeros”, so timeString(19, 5) returns the string "07:05 PM".

public static String timeString(int hour, int minute) {
    String ampm;
    if (hour < 12) {
        ampm = "AM";
        if (hour == 0) {
            hour = 12;  // midnight
        }
    } else {
        ampm = "PM";
        hour = hour - 12;
    }

    // returns "07:05 PM"
    return String.format("%02d:%02d %s", hour, minute, ampm);
}

Exercises:

[Key Exercise] printPrice method

Implement the printPrice method in the code below to produce the given output. Its behavior:

  • The parameter item is a string in the format name--$price i.e., a name and a price of an item separated using a -- e.g., banana--$3/50
  • It prints the NAME: price where the name is in upper case. The price does not have a $ sign and has . in place of the /
    e.g., banana--$3/50 BANANA: 3.50
  • The name part of the input can have trailing/leading spaces which should be omitted from the output.
    e.g., banana --$3/50 BANANA: 3.50

Do a Web search to find how to remove leading/trailing spaces. Suggested search terms java string remove leading trailing spaces

public class Main {

    public static void printPrice(String item) {
        // TODO: add your code here

    }

    public static void main(String[] args) {
        printPrice("sandwich  --$4/50");
        printPrice("  soda --$10/00");
        printPrice("  fries --$0/50");
    }
}

SANDWICH: 4.50
SODA: 10.00
FRIES: 0.50

Hint


W3.5d

C++ to Java → Some Useful Classes → Wrapper Classes for primitive types

Can use wrapper classes for primitive

Primitive values (like int, double, and char) do not provide methods.

For example, you can’t call equals on an int:

int i = 5;
System.out.println(i.equals(5));  // compiler error

But for each primitive type, there is a corresponding class in the Java library, called a wrapper class, as given in the table below. They are in the java.lang package i.e., no need to import.

Primitive type Wrapper class
byte Byte
short Short
int Integer
long Long
float Float
double Double
char Character
boolean Boolean

Double d = new Double(2.5);
int i = d.intValue();
System.out.println(d);
System.out.println(i);

2.5
2

Each wrapper class defines constants MIN_VALUE and MAX_VALUE.

Accessing max and min values for integers:

System.out.println(Integer.MIN_VALUE + " : " + Integer.MAX_VALUE);

-2147483648 : 2147483647

Wrapper classes provide methods for strings to other types e.g., Integer.parseInt converts a string to (you guessed it) an integer. The other wrapper classes provide similar methods, like Double.parseDouble and Boolean.parseBoolean.

Integer.parseInt("1234") 1234

Wrapper classes also provide toString, which returns a string representation of a value.

Integer.toString(1234) "1234"


Exercises:

[Key Exercise] printTotalScore method

Implement the printTotalScore method in the code below to produce the given output. Its behavior:

  • values is an array of strings, each string representing an integer e.g., ["5", "-1"]
  • The method prints the total of the numbers represented by the strings in the array
    ["5", "-1"] 4
public class Main {

    public static void printTotalScore(String[] values){
        // TODO: add your code here
    }

    public static void main(String[] args) {
        printTotalScore(new String[]{});
        printTotalScore(new String[]{"0", "124", "-15"});
    }
}

0
109


W3.5e

C++ to Java → Some Useful Classes → The Arrays class

Can use the Arrays class

java.util.Arrays provides methods for working with arrays. One of them, toString, returns a string representation of an array. It also provides a copyOf that copies an array.

Using Arrays.copyOf and Arrays.toString:

int[] a = new int[]{1,2,3,4};

int[] b = Arrays.copyOf(a, 3); // copy first three elements
System.out.println(Arrays.toString(b));

int[] c = Arrays.copyOf(a, a.length); // copy all elements
System.out.println(Arrays.toString(c));

[1, 2, 3]
[1, 2, 3, 4]

Exercises:

[Key Exercise] filterEmails method

Implement the following two methods in the code below to produce the given output.

  • filterEmails(String[] items): String[]
    • items is an array of strings each of which may be an email address or some other random string
    • Returns a String[] containing email addresses that were in items. Any string containing @ is considered as an email.
      ["aaa@bbb", "xyz"] ["aaa@bbb"]
  • printItems(String[] items)
    • Prints items in the standard array format. e.g., ["aaa", "bbb"] [aaa, bbb]
import java.util.Arrays;

public class Main {
    public static String[] filterEmails(String[] items){
        // TODO: add your code here
    }

    public static void printItems(String[] items){
        // TODO: add your code here
    }

    public static void main(String[] args) {
        printItems(filterEmails(new String[]{}));
        printItems(filterEmails(new String[]{"abc"}));
        printItems(filterEmails(new String[]{"adam@example.com", "aab", "john@example.com", "some@"}));
        printItems(filterEmails(new String[]{"xyz", "@bee.com", "aab"}));
    }
}

[]
[]
[adam@example.com, john@example.com, some@]
[@bee.com]

Hint


W3.5f

C++ to Java → Some Useful Classes → The Scanner class

Can use the Scanner class

Scanner is a class that provides methods for inputting words, numbers, and other data. Scanner provides a method called nextLine that reads a line of input from the keyboard and returns a String. The following example reads two lines and repeats them back to the user:

import java.util.Scanner;

public class Echo {

    public static void main(String[] args) {
        String line;
        Scanner in = new Scanner(System.in);

        System.out.print("Type something: ");
        line = in.nextLine();
        System.out.println("You said: " + line);

        System.out.print("Type something else: ");
        line = in.nextLine();
        System.out.println("You also said: " + line);
    }
}

Scanner class normally reads inputs as strings but it can read in a specific type of input too.

The code below uses the nextInt method of the Scanner class to read an input as an integer.


Scanner in = new Scanner(System.in);

System.out.print("What is your age? ");
int age = in.nextInt();
in.nextLine();  // read the new-line character that follows the integer
System.out.print("What is your name? ");
String name = in.nextLine();
System.out.printf("Hello %s, age %d\n", name, age);

Note the use of printf method for formatting the output.


Exercises:

[Key Exercise] find total expenditure

Write a program to ask the user for a description of overseas expenses (presumably, the user has just returned from an overseas trip) and calculate the total in local currency.

  • The conversion rate from overseas currency to local currency : overseas $1.0 = local $1.70
  • The user can describe expenses is in free form text, as one line. The program takes all amounts mentioned in the format $amount e.g., $1.50

Here is one example output:

Your expenses while overseas?beer $4.50 books $3.00 $5.00 for food, that's all
Expenses in overseas currency:[$4.50, $3.00, $5.00]
Total in local currency: $21.25

Here is another:

Your expenses while overseas?nothing. I lived off my friends all the time.
Expenses in overseas currency:[]
Total in local currency: $0.00

One more:

Your expenses while overseas? Just $10
Expenses in overseas currency:[$10]
Total in local currency: $17.00

Here's the skeleton code to use as the starting point:

public class Main {

    // You can add more methods here

    public static void main(String[] args) {
        String line;
        Scanner in = new Scanner(System.in);

        System.out.print("Your expenses while overseas?");
       // TODO: add your code here
    }
}

You can use the split method of the String class to convert a sentence into an array of words. e.g.,

String sentence = "hello my dear";

// split using the space as the delimiter
String[] words = sentence.split(" ");

System.out.println(Arrays.toString(words));

[hello, my, dear]

Hint


Guidance for the item(s) below:

Previously, you learned about coding standards as a way to improve code quality. The next topic along that theme covers guidelines for naming things in code.

[W3.6] Code Quality: Naming

W3.6a

Implementation → Code Quality → Naming → Introduction

Can explain the need for good names in code

Proper naming improves the readability of code. It also reduces bugs caused by ambiguities regarding the intent of a variable or a method.

There are only two hard things in Computer Science: cache invalidation and naming things. -- Phil Karlton


W3.6b

Implementation → Code Quality → Naming → Basic → Use nouns for things and verbs for actions

Can improve code quality using technique: use nouns for things and verbs for actions

Every system is built from a domain-specific language designed by the programmers to describe that system. Functions are the verbs of that language, and classes are the nouns.
-- Robert C. Martin, Clean Code: A Handbook of Agile Software Craftsmanship

Use nouns for classes/variables and verbs for methods/functions.

Name for a Bad Good
Class CheckLimit LimitChecker
Method result() calculate()

Distinguish clearly between single-valued and multi-valued variables.

Good

Person student;
ArrayList<Person> students;

Good

name = 'Jim'
names = ['Jim', 'Alice']

W3.6c

Implementation → Code Quality → Naming → Basic → Use standard words

Can improve code quality using technique: use standard words

Use correct spelling in names. Avoid 'texting-style' spelling. Avoid foreign language words, slang, and names that are only meaningful within specific contexts/times e.g. terms from private jokes, a TV show currently popular in your country.


W3.6d

Implementation → Code Quality → Naming → Intermediate → Use name to explain

Can improve code quality using technique: use name to explain

A name is not just for differentiation; it should explain the named entity to the reader accurately and at a sufficient level of detail.

Bad Good
processInput() (what 'process'?) removeWhiteSpaceFromInput()
flag isValidInput
temp

If a name has multiple words, they should be in a sensible order.

Bad Good
bySizeOrder() orderBySize()

Imagine going to the doctor's and saying "My eye1 is swollen"! Don’t use numbers or case to distinguish names.

Bad Bad Good
value1, value2 value, Value originalValue, finalValue

W3.6e

Implementation → Code Quality → Naming → Intermediate → Not too long, not too short

Can improve code quality using technique: not too long, not too short

While it is preferable not to have lengthy names, names that are 'too short' are even worse. If you must abbreviate or use acronyms, do it consistently. Explain their full meaning at an obvious location.


W3.6f

Implementation → Code Quality → Naming → Intermediate → Avoid misleading names

Can improve code quality using technique: avoid misleading names

Related things should be named similarly, while unrelated things should NOT.

Example: Consider these variables

  • colorBlack: hex value for color black
  • colorWhite: hex value for color white
  • colorBlue: number of times blue is used
  • hexForRed: hex value for color red

This is misleading because colorBlue is named similar to colorWhite and colorBlack but has a different purpose while hexForRed is named differently but has a very similar purpose to the first two variables. The following is better:

  • hexForBlack hexForWhite hexForRed
  • blueColorCount

Avoid misleading or ambiguous names (e.g. those with multiple meanings), similar sounding names, hard-to-pronounce ones (e.g. avoid ambiguities like "is that a lowercase L, capital I or number 1?", or "is that number 0 or letter O?"), almost similar names.

Bad Good Reason
phase0 phaseZero Is that zero or letter O?
rwrLgtDirn rowerLegitDirection Hard to pronounce
right left wrong rightDirection leftDirection wrongResponse right is for 'correct' or 'opposite of 'left'?
redBooks readBooks redColorBooks booksRead red and read (past tense) sounds the same
FiletMignon egg If the requirement is just a name of a food, egg is a much easier to type/say choice than FiletMignon


Guidance for the item(s) below:

Previously, you learned how to save revision history in your local repository, in the form of commits. Next, let us use how to make use of that history.

[W3.7] RCS: Using History

W3.7a

Project Management → Revision Control → Using history

Can explain basic concepts of how RCS history is used

RCS tools store the history of the working directory as a series of commits. This means you should commit after each change that you want the RCS to 'remember'.

Each commit in a repo is a recorded point in the history of the project that is uniquely identified by an auto-generated hash e.g. a16043703f28e5b3dab95915f5c5e5bf4fdc5fc1.

You can tag a specific commit with a more easily identifiable name e.g. v1.0.2.

To see what changed between two points of the history, you can ask the RCS tool to diff the two commits in concern.

To restore the state of the working directory at a point in the past, you can checkout the commit in concern. i.e., you can traverse the history of the working directory simply by checking out the commits you are interested in.


W3.7b

Tools → Git and GitHub → diff: Comparing revisions

Can compare git revisions

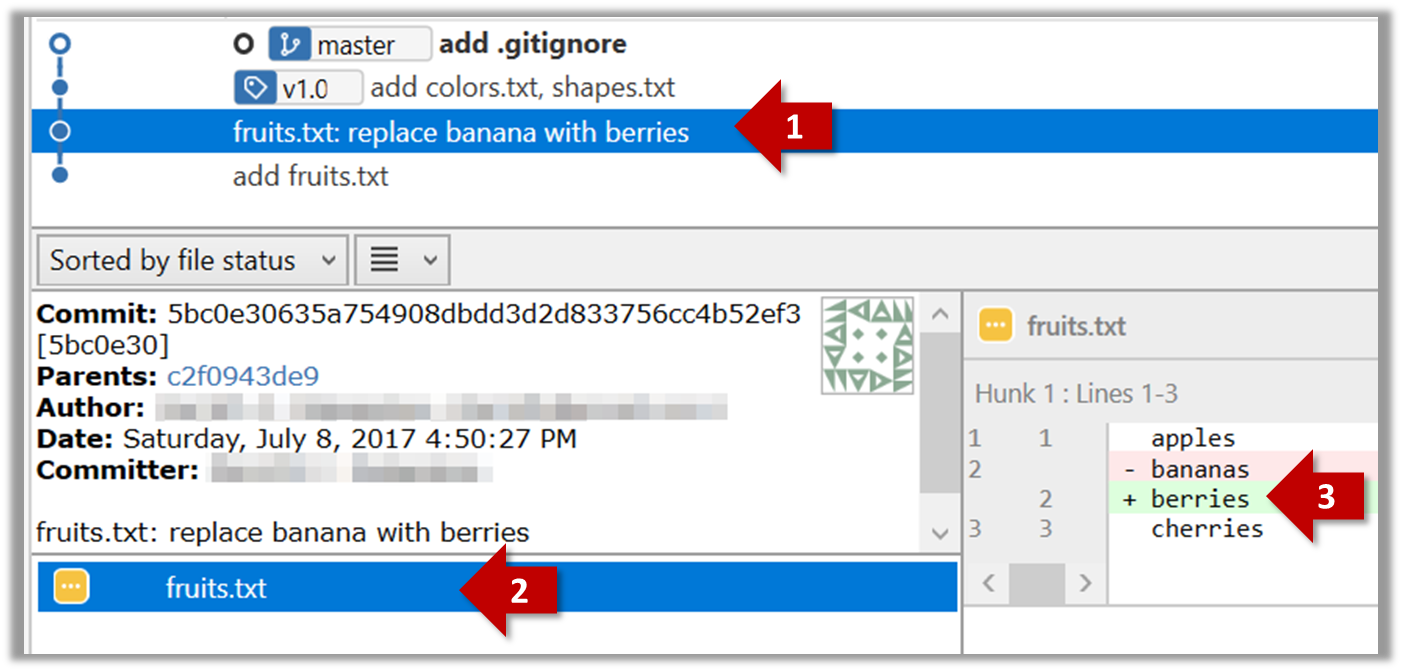
Git can show you what changed in each commit.

To see which files changed in a commit, click on the commit. To see what changed in a specific file in that commit, click on the file name.


$ git show < part-of-commit-hash >

Example:

$ git show 5bc0e306

commit 5bc0e30635a754908dbdd3d2d833756cc4b52ef3
Author: … < … >
Date:   Sat Jul 8 16:50:27 2017 +0800

    fruits.txt: replace banana with berries

diff --git a/fruits.txt b/fruits.txt
index 15b57f7..17f4528 100644
--- a/fruits.txt
+++ b/fruits.txt
@@ -1,3 +1,3 @@
 apples
-bananas
+berries
 cherries

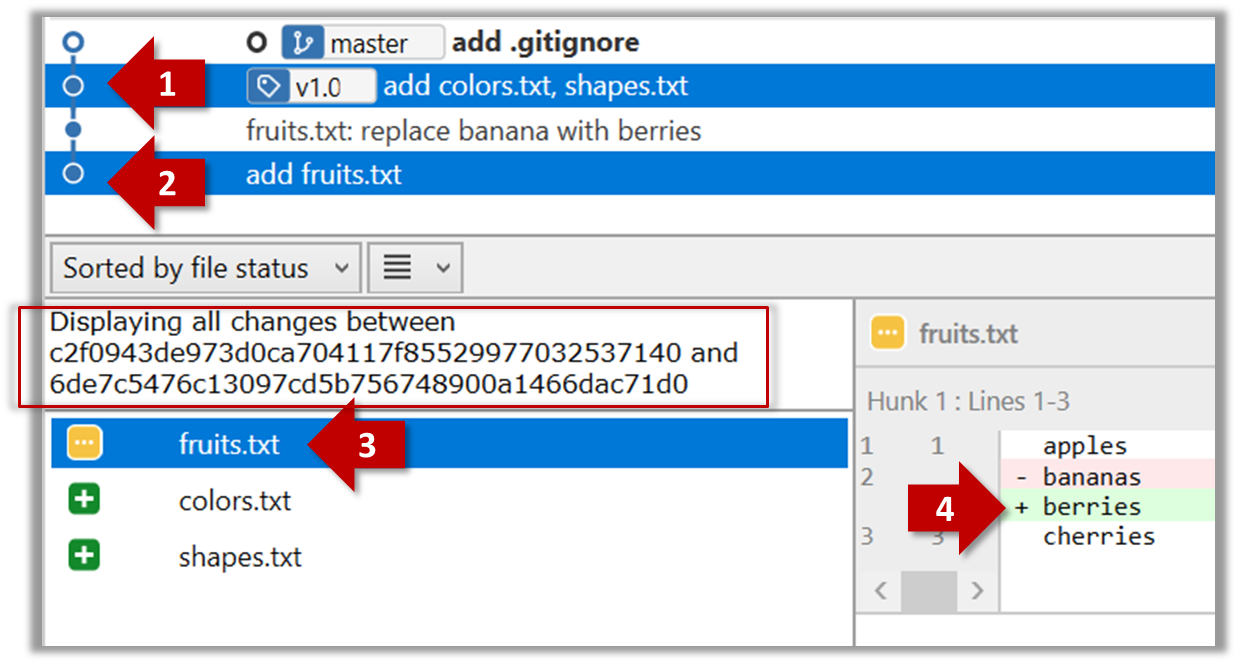
Git can also show you the difference between two points in the history of the repo.

Select the two points you want to compare using Ctrl+Click. The differences between the two selected versions will show up in the bottom half of Sourcetree, as shown in the screenshot below.

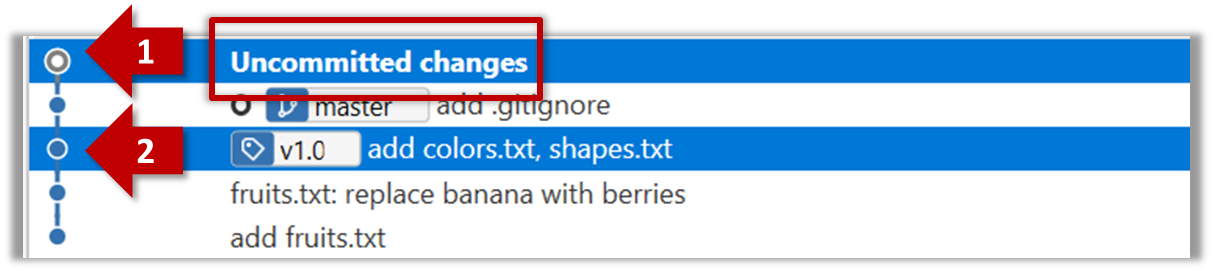
The same method can be used to compare the current state of the working directory (which might have uncommitted changes) to a point in the history.


The diff command can be used to view the differences between two points of the history.

  • git diff: shows the changes (uncommitted) since the last commit.
  • git diff 0023cdd..fcd6199: shows the changes between the points indicated by commit hashes.
    Note that when using a commit hash in a Git command, you can use only the first few characters (e.g., first 7-10 chars) as that's usually enough for Git to locate the commit.
  • git diff v1.0..HEAD: shows changes that happened from the commit tagged as v1.0 to the most recent commit.


W3.7c

Tools → Git and GitHub → checkout: Retrieving a specific revision

Can load a specific version of a Git repo

Git can load a specific version of the history to the working directory. Note that if you have uncommitted changes in the working directory, you need to stash them first to prevent them from being overwritten.

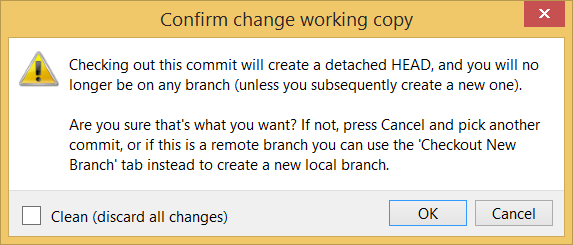
Double-click the commit you want to load to the working directory, or right-click on that commit and choose Checkout....

Click OK to the warning about ‘detached HEAD’ (similar to below).

The specified version is now loaded to the working folder, as indicated by the HEAD label. HEAD is a reference to the currently checked out commit.

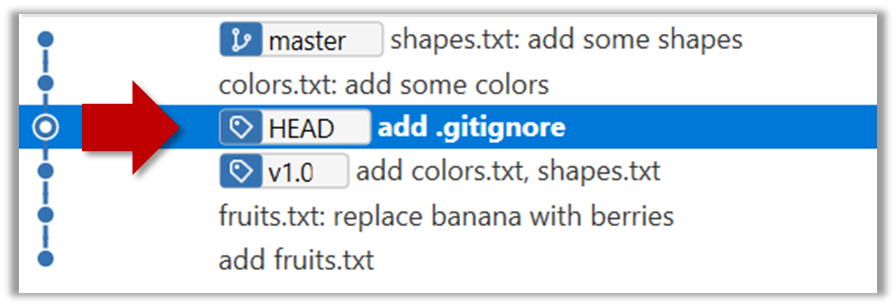
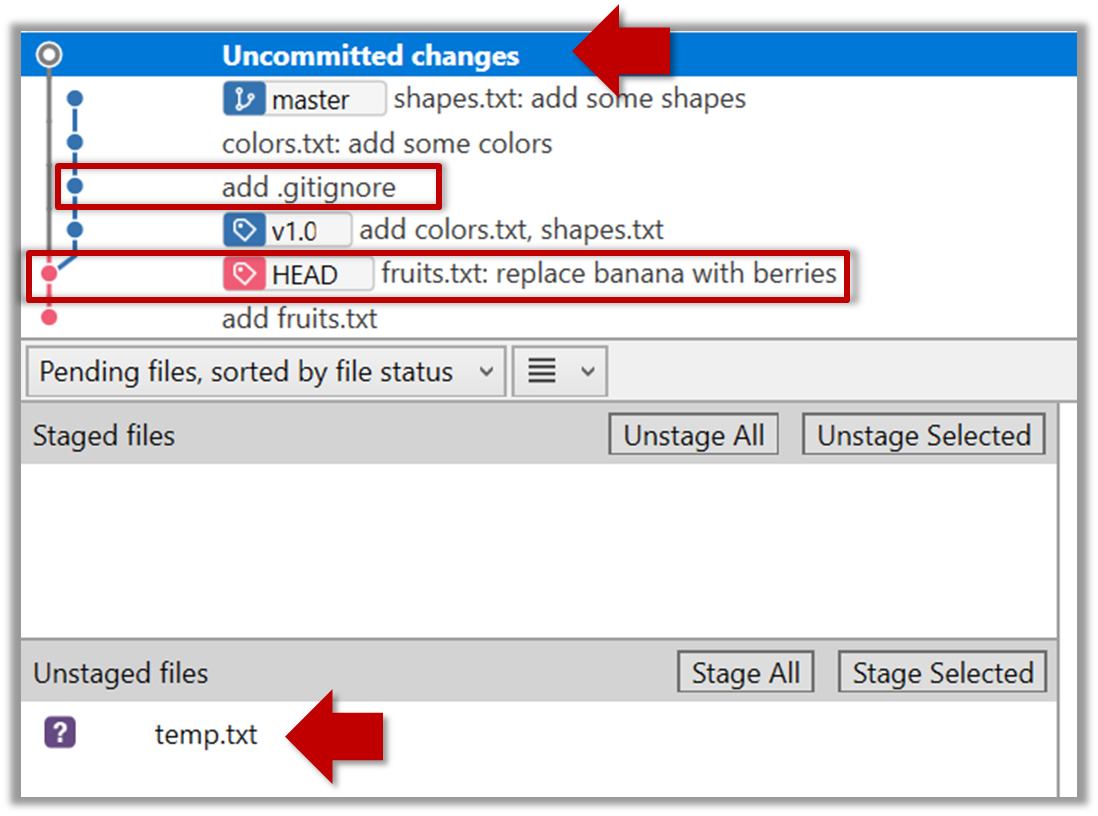
If you checkout a commit that comes before the commit in which you added the .gitignore file, Git will now show ignored files as ‘unstaged modifications’ because at that stage Git hasn’t been told to ignore those files.

To go back to the latest commit, double-click it.


Use the checkout <commit-identifier> command to change the working directory to the state it was in at a specific past commit.

  • git checkout v1.0: loads the state as at commit tagged v1.0
  • git checkout 0023cdd: loads the state as at commit with the hash 0023cdd
  • git checkout HEAD~2: loads the state that is 2 commits behind the most recent commit

For now, you can ignore the warning about ‘detached HEAD’.


W3.7d

Tools → Git and GitHub → tag: Naming commits

Can tag commits using Git

Each Git commit is uniquely identified by a hash e.g., d670460b4b4aece5915caf5c68d12f560a9fe3e4. As you can imagine, using such an identifier is not very convenient for our day-to-day use. As a solution, Git allows adding a more human-readable tag to a commit e.g., v1.0-beta.

Here's how you can tag a commit in a local repo:

Right-click on the commit (in the graphical revision graph) you want to tag and choose Tag….

Specify the tag name e.g. v1.0 and click Add Tag.

The added tag will appear in the revision graph view.


To add a tag to the current commit as v1.0:

$ git tag –a v1.0

To view tags:

$ git tag

To learn how to add a tag to a past commit, go to the ‘Git Basics – Tagging’ page of the git-scm book and refer the ‘Tagging Later’ section.


After adding a tag to a commit, you can use the tag to refer to that commit, as an alternative to using the hash.

Tags are different from commit messages, in purpose and in form. A commit message is a description of the commit that is part of the commit itself. A tags is a short name for a commit, which exists as a separate entity that points to a commit.


W3.7e

Tools → Git and GitHub → stash: Shelving changes temporarily

Can use Git to stash files

You can use Git's stash feature to temporarily shelve (or stash) changes you've made to your working copy so that you can work on something else, and then come back and re-apply the stashed changes later on. -- adapted from Atlassian

Follow this article from Sourcetree creators. Note that the GUI shown in the article is slightly outdated but you should be able to map it to the current GUI.


Guidance for the item(s) below:

Last week, you learned how to fork and clone a remote repository. Let's now learn how to transfer revision history date to and from a remote repository.

[W3.8] RCS: Pull, Push

W3.8a

Tools → Git and GitHub → pull, fetch: Downloading data from other repos

Can pull changes from a repo

Here's a scenario you can try in order to learn how to pull commits from another repo to yours.

1. Clone a repo (e.g., the repo used in [Git & GitHub → Clone]) to be used for this activity.

2. Delete the last few commits to simulate cloning the repo a few commits ago.

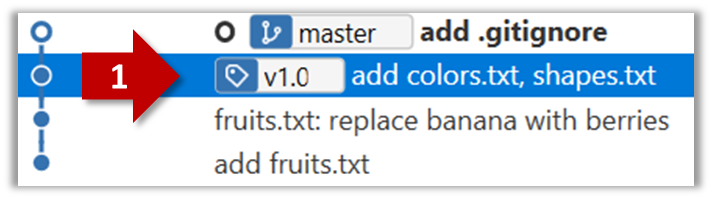
Right-click the target commit (i.e. the commit that is 2 commits behind the tip) and choose Reset current branch to this commit.

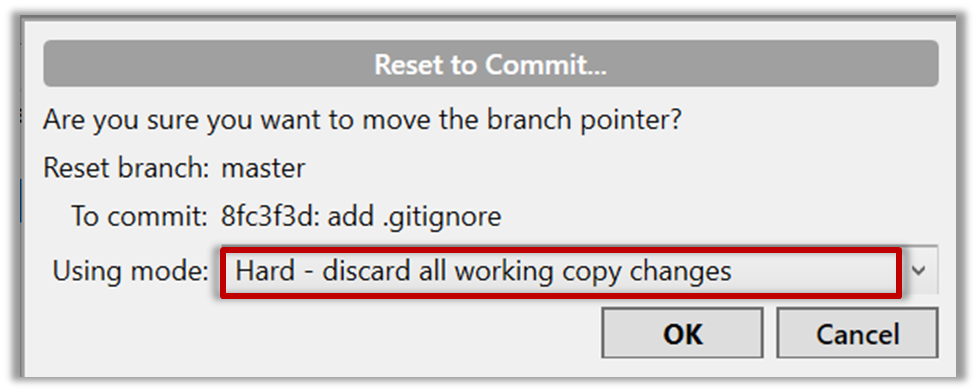
Choose the Hard - … option and click OK.

This is what you will see.

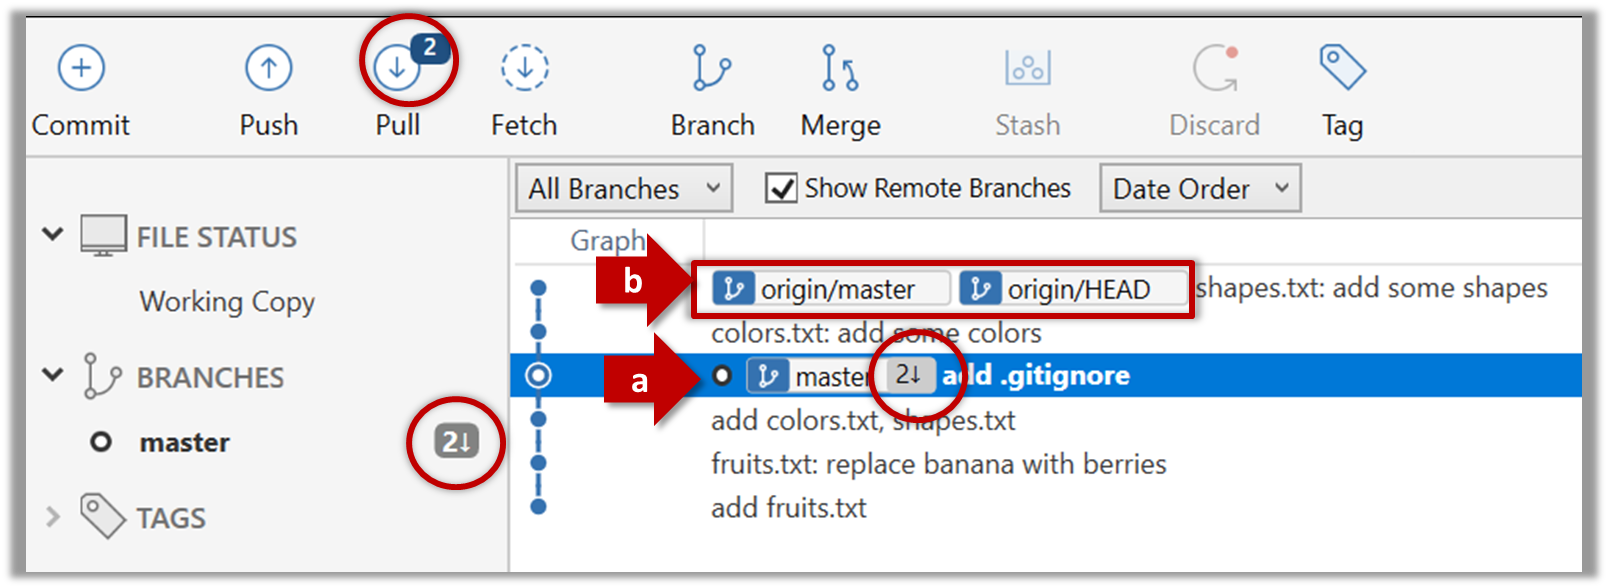
Note the following (cross-refer the screenshot above):

Arrow marked as a: The local repo is now at this commit, marked by the master label.
Arrow marked as b: The origin/master label shows what is the latest commit in the master branch in the remote repo. origin is the default name given to the upstream repo you cloned from.


Use the reset command to delete commits at the tip of the revision history.

$ git reset --hard HEAD~2

More info on the git reset command can be found here.


Now, your local repo state is exactly how it would be if you had cloned the repo 2 commits ago, as if somebody has added two more commits to the remote repo since you cloned it.

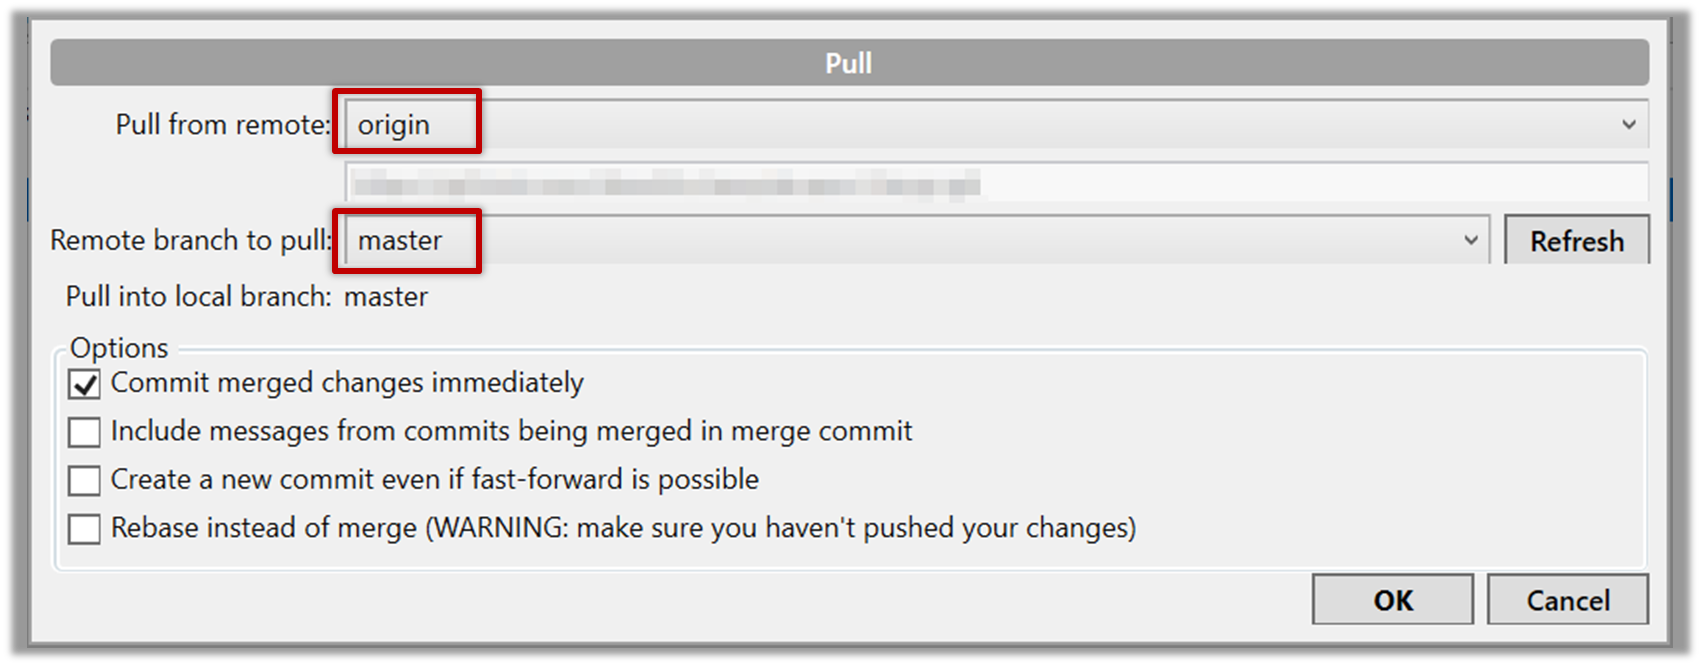
3. Pull from the other repo: To get those missing commits to your local repo (i.e. to sync your local repo with upstream repo) you can do a pull.

Click the Pull button in the main menu, choose origin and master in the next dialog, and click OK.

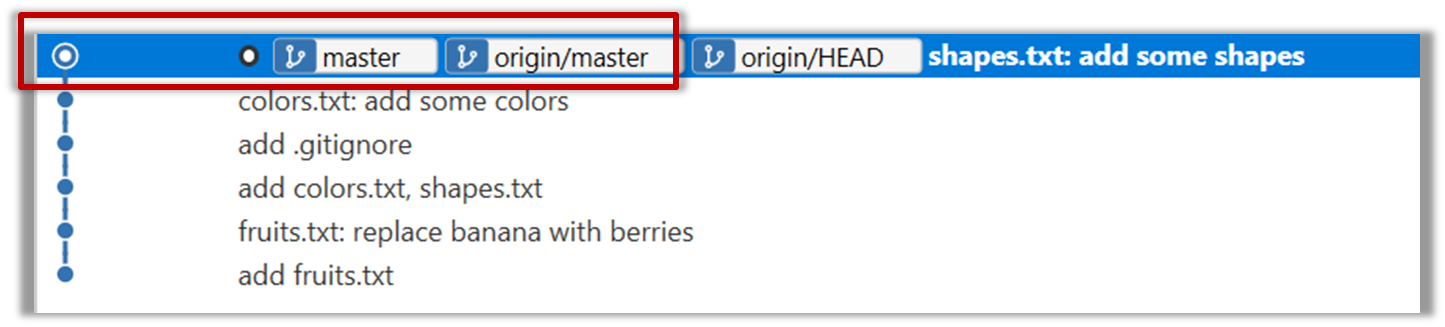
Now you should see something like this where master and origin/master are both pointing the same commit.


$ git pull origin

You can also do a fetch instead of a pull in which case the new commits will be downloaded to your repo but the working directory will remain at the current commit. To move the current state to the latest commit that was downloaded, you need to do a merge. A pull is a shortcut that does both those steps in one go.

Working with multiple remotes

When you clone a repo, Git automatically adds a remote repo named origin to your repo configuration. As you know, you can pull commits from that repo. As you know, a Git repo can work with remote repos other than the one it was cloned from.

To communicate with another remote repo, you can first add it as a remote of your repo. Here is an example scenario you can follow to learn how to pull from another repo:

  1. Open the local repo in Sourcetree. Suggested: Use your local clone of the samplerepo-things repo.

  2. Choose RepositoryRepository Settings menu option.

  3. Add a new remote to the repo with the following values.

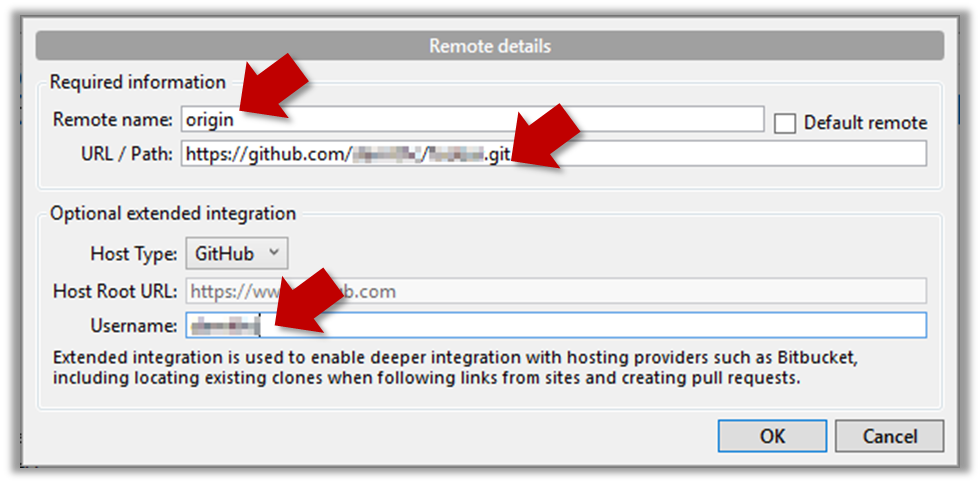
    • Remote name: the name you want to assign to the remote repo e.g., upstream1
    • URL/path: the URL of your repo (ending in .git) that. Suggested: https://github.com/se-edu/samplerepo-things-2.git (samplerepo-things-2 is another repo that has a shared history with samplerepo-things)
    • Username: your GitHub username

  4. Now, you can fetch or pull (pulling will fetch the branch and merge the new code to the current branch) from the added repo as you did before but choose the remote name of the repo you want to pull from (instead of origin):
    Click the Fetch button or the Pull button first.

    If the Remote branch to pull dropdown is empty, click the Refresh button on its right.

  5. If the pull from the samplerepo-things-2 was successful, you should have received one more commit into your local repo.


  1. Navigate to the folder containing the local repo.

  2. Set the new remote repo as a remote of the local repo.
    command: git remote add {remote_name} {remote_repo_url}
    e.g., git remote add upstream1 https://github.com/johndoe/foobar.git

  3. Now you can fetch or pull (pulling will fetch the branch and merge the new code to the current branch) from the new remote.
    e.g., git fetch upstream1 master followed by git merge upstream1/master, or,
    git pull upstream1 master


W3.8b

Tools → Git and GitHub → push: Uploading data to other repos

Can push to a remote repo

Given below is a scenario you can try in order to learn how to push commits to a remote repo hosted on GitHub:

1. Fork an existing GitHub repo (e.g., samplerepo-things) to your GitHub account.

2. Clone the fork (not the original) to your computer.

3. Commit some changes in your local repo.

4. Push the new commits to your fork on GitHub

Click the Push button on the main menu, ensure the settings are as follows in the next dialog, and click the Push button on the dialog.


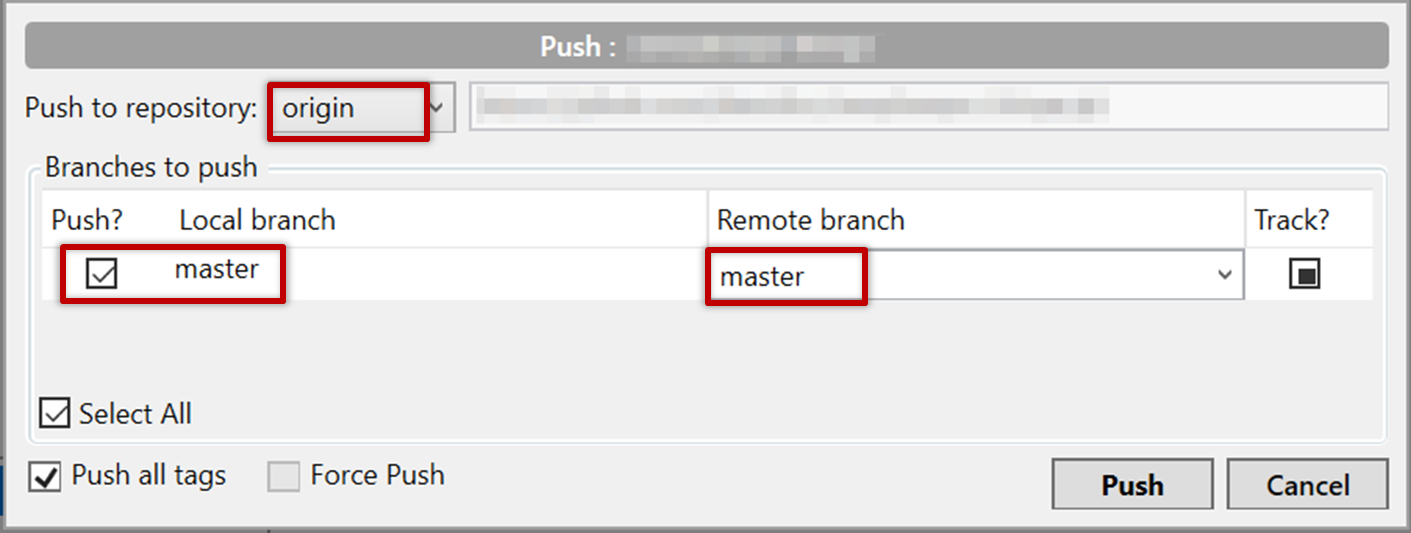
Use the command git push origin master. Enter your Github username and password when prompted.


5. Add a few more commits, and tag some of them.

6. Push the new commits and the tags.

Push similar to before, but ensure the [ ] Push all tags option in the push dialog is ticked as well.


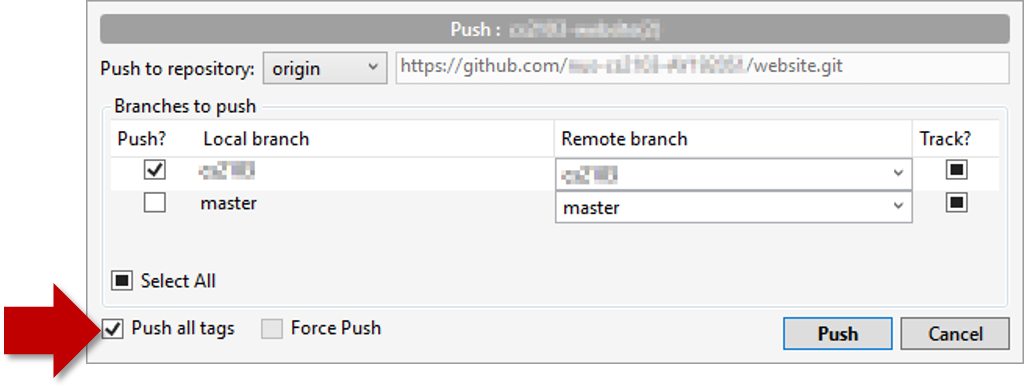
A normal push does not include tags. After pushing the commits (as before), push tags to the repo as well:

To push a specific tag:

$ git push origin v1.0b

To push all tags:

$ git push origin --tags

You can push to repos other than the one you cloned from, as long as the target repo and your repo have a shared history.

  1. Add the GitHub repo URL as a remote, if you haven't done so already.
  2. Push to the target repo.

Push your repo to the new remote the usual way, but select the name of target remote instead of origin and remember to select the Track checkbox.


Push to the new remote the usual way e.g., git push upstream1 master (assuming you gave the name upstream1 to the remote).


You can even push an entire local repository to GitHub, to form an entirely new remote repository. For example, you created a local repo and worked with it for a while but now you want to upload it onto GitHub (as a backup or to share it with others). The steps are given below.

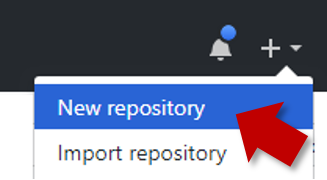
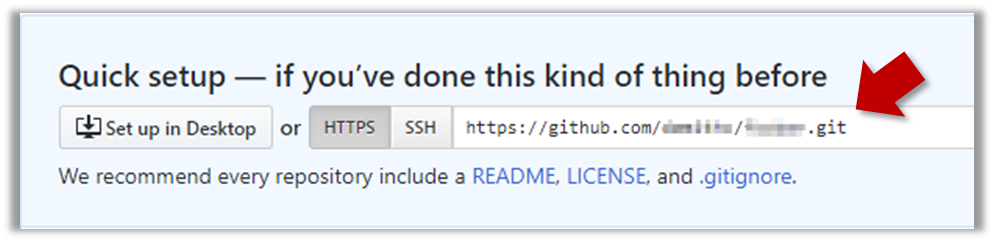
1. Create an empty remote repo on GitHub.

  1. Login to your GitHub account and choose to create a new Repo.

  2. In the next screen, provide a name for your repo but keep the Initialize this repo ... tick box unchecked.

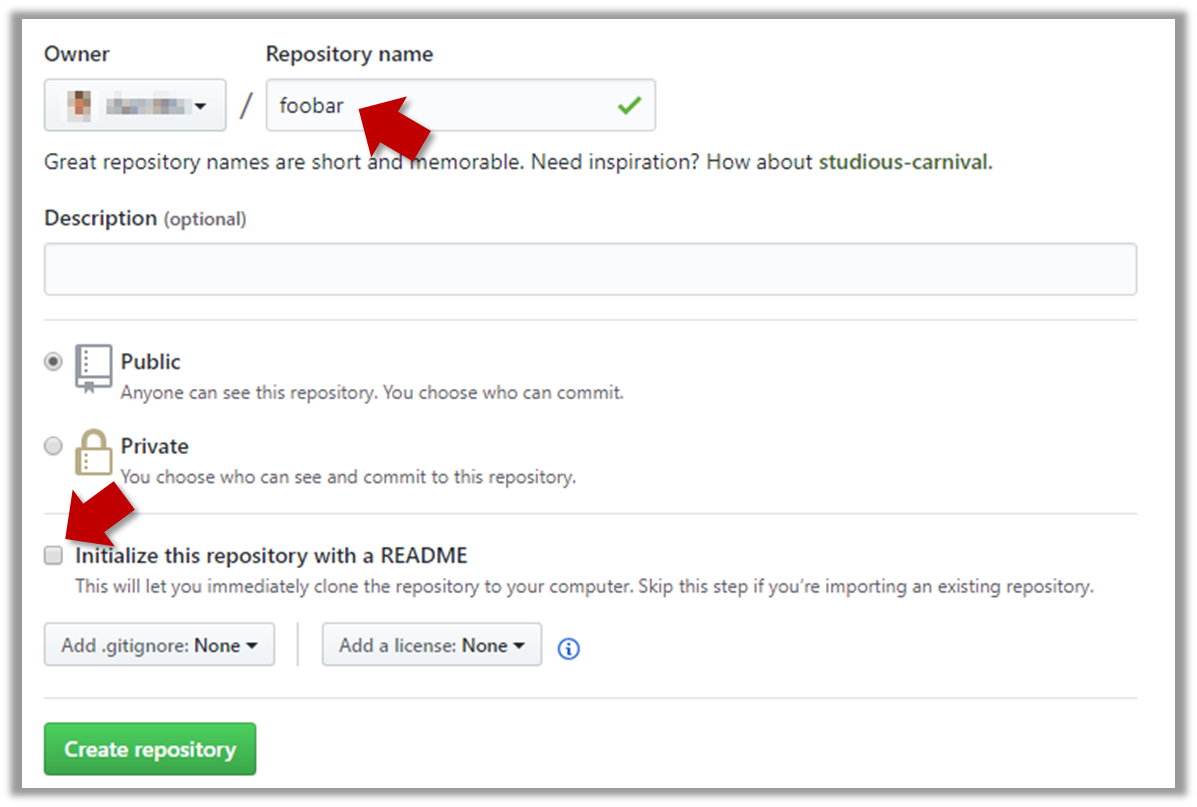
  3. Note the URL of the repo. It will be of the form https://github.com/{your_user_name}/{repo_name}.git.
    e.g., https://github.com/johndoe/foobar.git (note the .git at the end)

2. Add the GitHub repo URL as a remote of the local repo. You can give it the name origin (or any other name).

3. Push the repo to the remote.


Push each branch to the new remote the usual way but use the -u flag to inform Git that you wish to the branch.
e.g., git push -u origin master